 United Kingdom Tank Losses March to May 1945
This article has been sponsored by VeePN. If you want to browse the internet more safely and block your Internet Provider or Government from tracking you, try out their offers.
Operations Veritable, Blockbuster, and Grenade marked the breakout from Holland for Allied forces during February and March 1945. These were followed by a strong push across the border into Germany, bitter fighting in the Reichswald forest and then the crossing of the Rhine (Operation Plunder). Between the time of the crossing of the Rhine on 24th March 1945, and the end of the war in North West Europe on 5th May 1945, 21st Army Group suffered a total of 769 men killed and injured across 19 British Armoured Regiments, along with the loss of 333 Armored Fighting Vehicles.
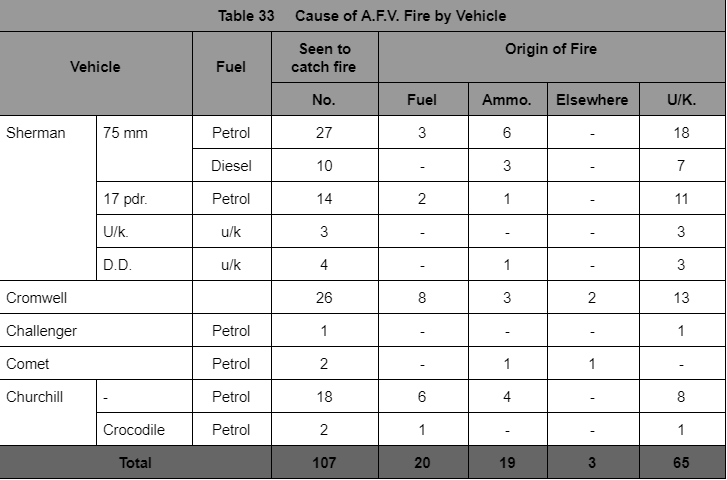
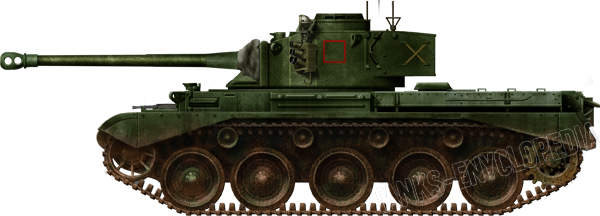
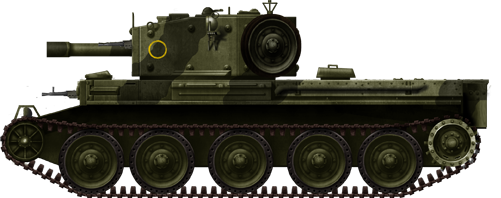
Those 333 AFVs were primarily Cruiser tanks, such as the A.27 Cromwell, A.34 Comet, and A.30 Challenger. In addition, some units fighting in the area were equipped with A.22 Churchill tanks and the Canadian units were equipped with M4 Sherman tanks. In 1946, as a part of an ongoing effort to improve both the habitability and survivability of tanks, the Royal Army Medical School, on behalf of the Medical Research Commission (M.R.C.), produced a short series of analytical reports looking at the casualties and, in particular, at the causes of them. As the majority of actions led to capturing the ground being fought over, the British examiners, Captain H. Wright and Captain R. Harkness, managed to examine 65% of all of the vehicles lost to enemy action.
A close look at these reports provides a unique and interesting insight into the nature of tank warfare and provides clues into the design and operational use of armored fighting vehicles.

The Units
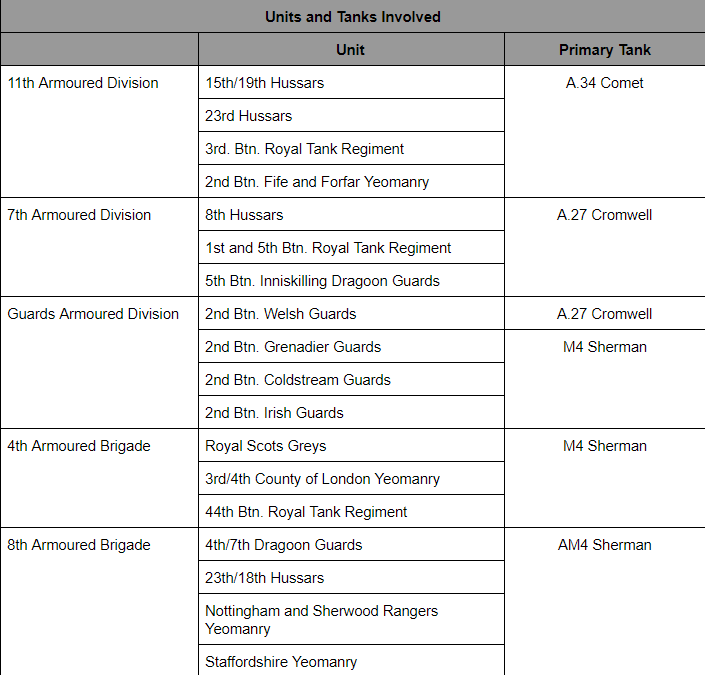
The armored units deployed by the British which formed part of the assessment of casualties came from a number of divisions, such as the 11th Armoured Division. That division consisted of the 15th/19th Hussars, 23rd Hussars, 3rd Battalion Royal Tank Regiment, and the 2nd Battalion Fife and Forfar Yeomanry, which were equipped with A.34 Comet Tanks. The 7th Armoured Division consisted of the 8th Hussars, 1st and 5th Battalion Royal Tank Regiment and 5th Battalion Inniskilling Dragoon Guards, which were equipped with A.27 Cromwell tanks.
Within the 11th Armoured Division was also the Guards Armoured Division, which consisted of 2nd Battalion Welsh Guards, equipped with A.27 Cromwells, and 2nd Battalion Grenadier Guards, 2nd Battalion Coldstream Guards, and 2nd Battalion Irish Guards, all equipped with M4 Sherman tanks. There was also the 4th Armoured Brigade, consisting of the Royal Scots Greys, 3rd/4th County of London Yeomanry, and 44th Battalion Royal Tank Regiment and these units were equipped with M4 Sherman tanks. Finally, there was 8th Armoured Brigade, consisting of 4th/7th Dragoon Guards, 13th/18th Hussars, Nottingham and Sherwood Rangers Yeomanry, and the Staffordshire Yeomanry, all of whom were equipped with M4 Sherman tanks.


Overview
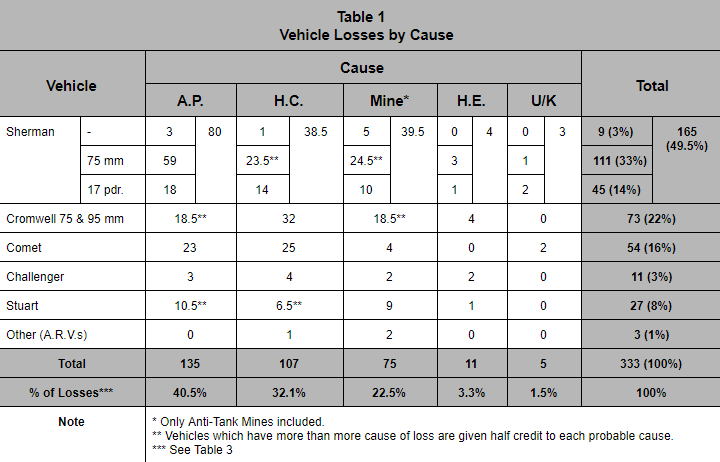
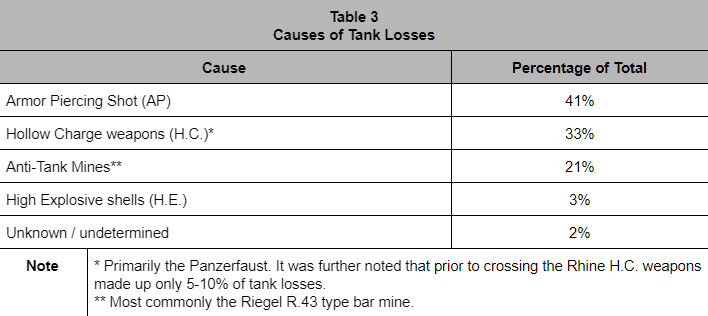
In analyzing the data, the authors started by taking total losses for tanks of all types and looking for the various causes of damage and loss (Table 1). Unsurprisingly, some units with a majority of M4 Sherman tanks, the M4 Sherman suffered the greatest percentage of the losses. This was closely followed by the A.27 Cromwell and A.34 Comet tanks (Table 2). It is very clear from the results presented in Table 1 that High Explosive (H.E.) shells, such as from artillery, amounted to just 3% of total losses and were therefore a statistically insignificant source of tank loss. By far and away the greatest cause of losses to all tanks was from penetrations of the armor by enemy Armor Piercing (A.P.) ammunition (Table 3).


Mines
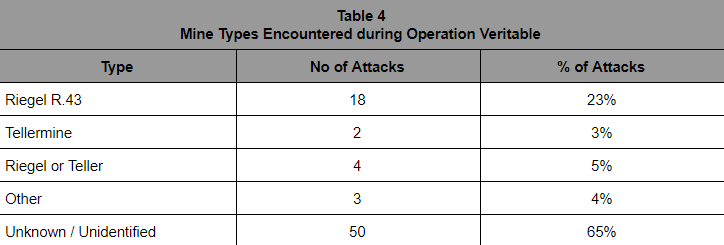
On the face of it, the identification of the type of mine involved in an incident with a tank is complicated by the total destruction of the device. The method used in the study was to take data from other mines located and cleared in the area to identify the most likely source of the mine encountered by the tank (Table 4). This was easy where a tank struck a mine and all that was found in the vicinity were other Riegel R.43 bar mines. That would make it very likely the culprit was one of that type. In a mixed minefield of Tellermines and Riegels, all that could be determined was that it was likely to be one of those two types. Many times, the paucity of other mines located or the lack of records as to which mine was found meant that no mine could reasonably be identified as the culprit encountered by the tank. On one occasion, an M4 Sherman tank was utterly destroyed by a large H.E. charge which had been buried and detonated under the vehicle. The crew were all killed and, whilst the incident was recorded, no data from that particular blast was included within the analysis, as it was a one-off and outlier as far as the study was concerned.
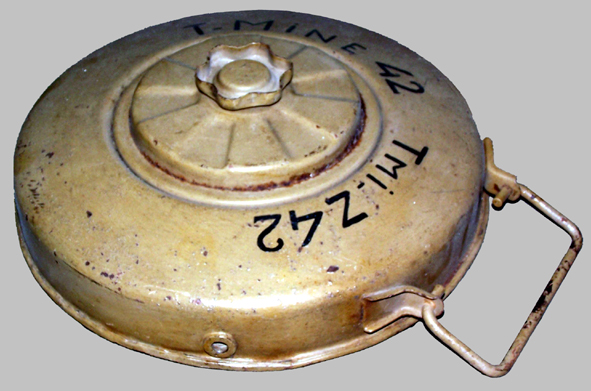
The Riegel R.43 (Sprengriegel R./Mi.43) was a bar mine – a long rectangular casing weighing 9.3 kg and containing 4 kg of TNT. A tank driving over the casing at any point would cause it to compress on the detonator and explode. The Teller-type mines, on the other hand, were cylindrical mines weighing just over 9 kg and holding around 5.5 kg of TNT. Although the Tellermines held more explosive, the cylinder was an inefficient shape, measuring just 31.8 cm in diameter (for the Tellermine T.Mi.35), whereas the Riegl bar mine was 80 cm long. This meant that a Riegel mine, once laid, had a greater chance of being under the track of a tank, although the effect once detonated was effectively the same.

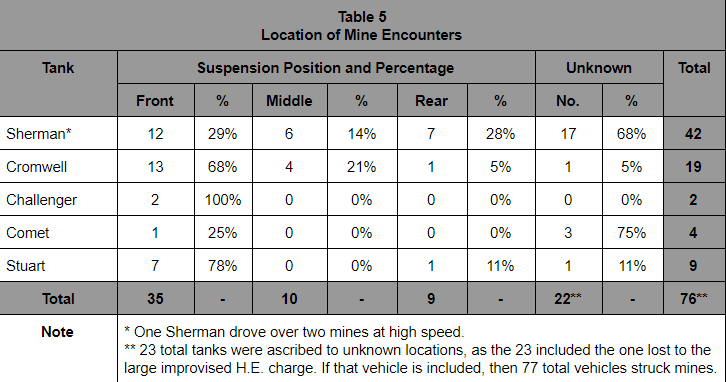
Each of these types of mines and variants had multiple options for detonation. These included connecting mines together so that, when one was triggered, it could set off more mines, or by connecting them to trip lines, anti-handling devices, and stakes which, when touched by a tank, would trip the fuse and trigger the mine. However, none of those situations seem to have been encountered by the tanks of the 21st Army Group. An analysis of the position of detonation of mines by tanks clearly showed they were the simple track-crushing-mine-and-triggering-them type of incidents rather than a specific booby trap to cause the mine to go off under the belly (Table 5). The casualties resulting from these mine encounters were therefore considerably lower than could be expected from a mine going off directly under the hull (Table 6). Thus, efforts to improve mine protection to counter that type of explosion were not warranted.
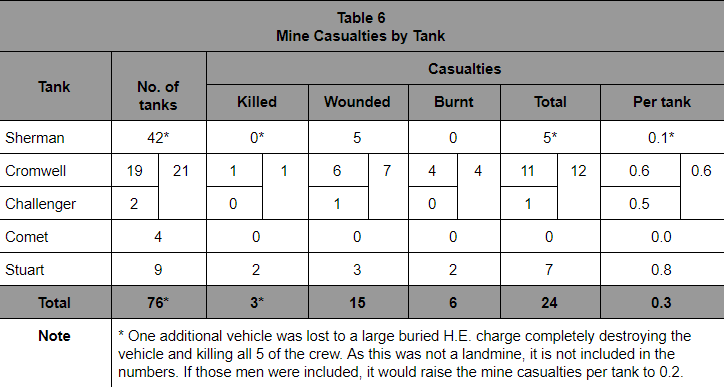
The cause of casualties to tank crews in relation to mine encounters was dependent on whether or not the floor plates of the tank were buckled, allowing the explosive blast to enter the crew space and injure the occupants. In this regard, the important considerations for the floor plates were the method of manufacturing, their thickness, and the height of the floor plates from the ground. The construction of the floor plates of the A.27 Cromwell and A.30 Challenger was effectively identical and, therefore, those vehicle’s encounters were grouped together. Looking at the data, the low ground clearance and relatively thin floor plates of the A.27 Cromwell show that it was substantially more at risk from damage by a mine blast than the M4 Sherman. The M4 Sherman tank, in fact, recorded no significant casualties from landmines at all, even in the situation where one vehicle managed to detonate two mines while driving at high speed. Overall, it was concluded by the authors that, whilst the M4 Sherman was indeed better protected against land mines than the A.27 Cromwell, overall, these were simply not a significantly important source of casualties. It may also be considered that, at this time in the war, the mines being laid by the Germans were ad-hoc or not properly prepared. The mine threat – once considered so serious that a whole slew of anti-tank mine clearance devices was developed, was not so great as first thought. On the whole, the majority of mine encounters caused minor injuries, suspension damage and inconvenience for the unit rather than a way of depleting Allied strength in any significant numbers.
Vehicle Casualties
For crew men, the definition of a casualty was simply any member of the vehicle’s crew who was killed or wounded. For those wounded, only those evacuated for treatment were included. Men who were injured but remained in the unit were not included. Once tabulated, the primary cause of crew man losses was assessed as being the result of penetrations of the armor from enemy guns firing Armor Piercing (A.P.) projectiles (Table 3).

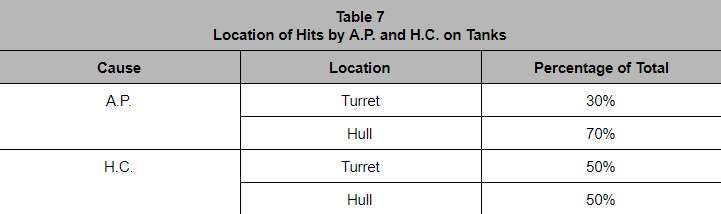
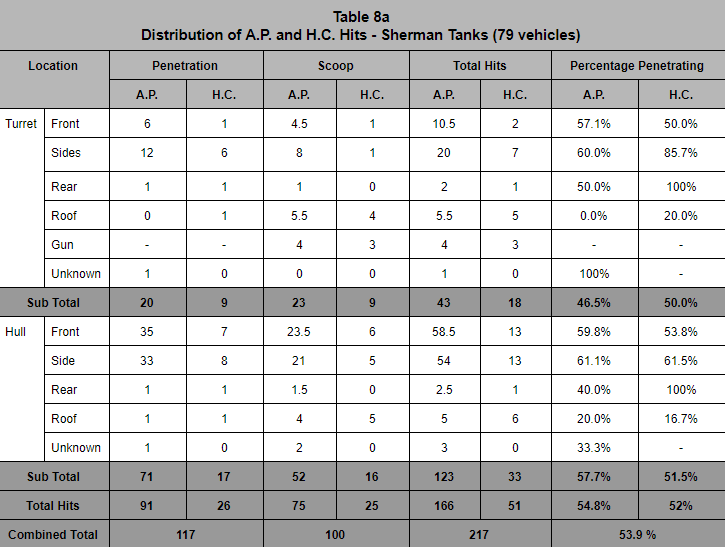
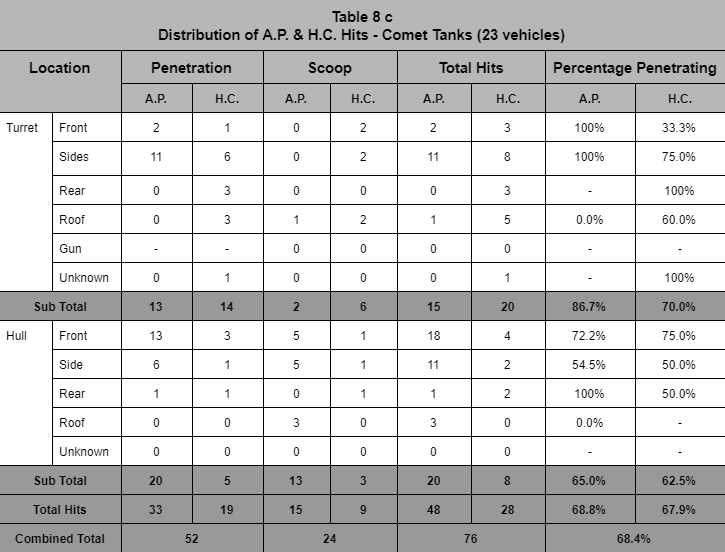
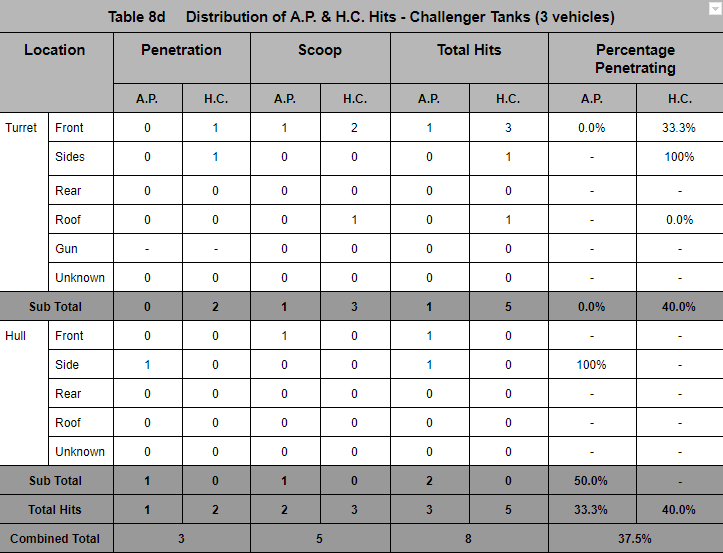
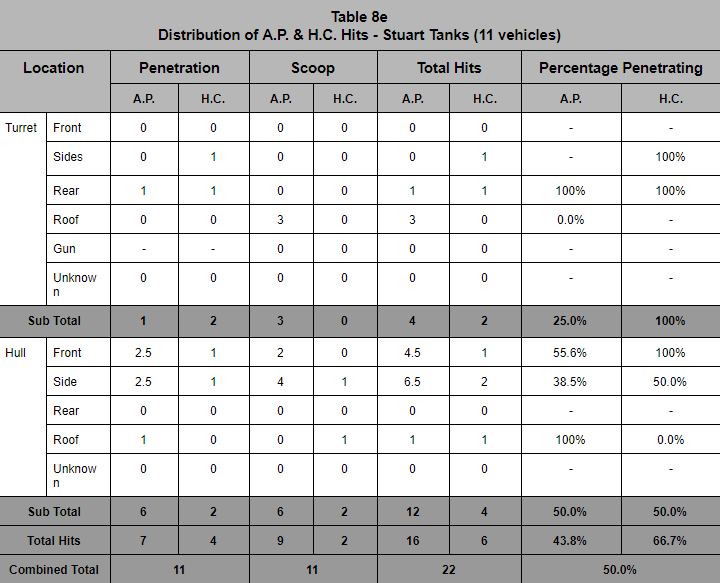
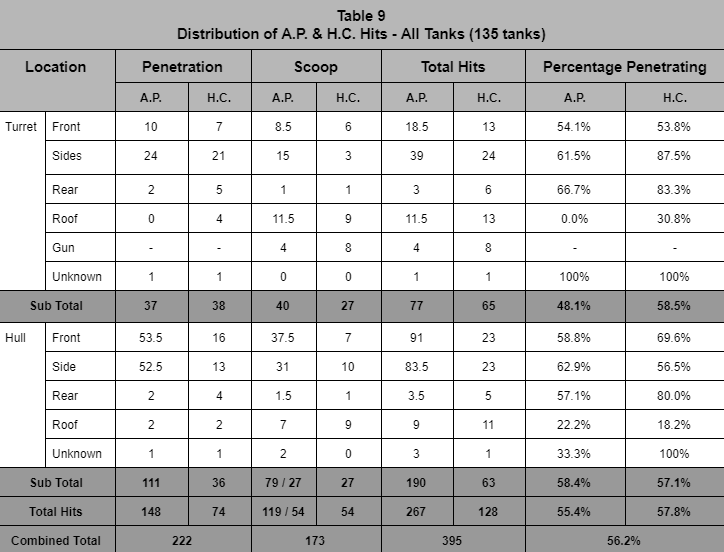
Having established that A.P. penetrations were the primary cause of loss and that Hollow Charge (H.C.) weapons like the Panzerfaust were the secondary one, it became important to consider where the tanks had been struck (Table 7), where the armor had withstood the enemy attack, and where the armor of the various tanks had failed (Tables 8a to 8e) and then to summarise those results (Table 9). This would provide useful data to inform future tank design and development in order to try and maximise protection for the tank and crew.


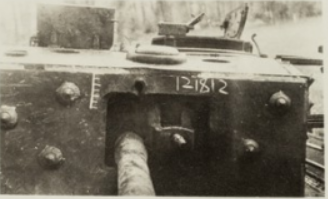
Sherman III W.D. No. 152104 belonging to 4th/7th Dragoon Guards. Hit numerous times, including several ineffective hits from Hollow Charge weapons on the front of the hull which failed to penetrate. A 75 mm A.P. round had pierced the front of the final drive, crippling the tank, and two rounds partially penetrated the machine gun housing on the hull and the glacis in front of the driver, respectively. At least 3 more 75 mm A.P. hits were received to the front left sprocket and three more on the hull front. One more 75 mm strike failed to penetrate the side of the tank and another the face of the turret. One H.C. penetration was received on the lower left side of the hull. No fire took place, although substantial internal damage was received. The crew escaped unhurt. Noteworthy is that this tank was carrying additional track links across the front, which were knocked off by the first 75 mm strikes, which were the ones which did not penetrate. The crew only bailed out after the third penetrating hit was received.


Sherman V DD (Duplex Drive) W.D. No. 232115 belonging to the Staffordshire Yeomanry. Struck by a 75 mm A.P. round at a range of 1,500 yards, the shell penetrated the rear applique armor, passed across the width of the tank and blew a jagged hole out of the other side as it exited. The tank caught fire instantly and the commander later died of wounds, the only fatality in the vehicle.


Sherman V W.D. No.147681 belonging to the 2nd Inniskilling Dragoons struck by a Hollow Charge at the base of the turret, leaving a 50 mm diameter hole, and by a 75 mm A.P. round (later identified as a 7.5 cm A.P.C.B.C. round from either a Pak. 40 or KwK. 40) on the hull side, below the left sponson. The H.C. caused only minor internal damage, but the penetrating 75 mm round left a hole 80 mm x 130 mm. No crew were injured and no fire resulted from either penetration. A third hit on the driver’s hatch left a mark only.


Stuart Light Tank W.D. No.287750 belonging to 4th/7th Dragoon Guards. The turret was struck in the upper right corner by a 75 mm A.P. round leaving an 80 mm wide entry hole (left). Passing through the turret, the round smashed out of the back (right) leaving a 90 mm wide exit hole. The vehicle was burnt out and the crew were unharmed, but this is believed to be due to exiting the vehicle for an unknown reason prior to being hit.
A simple clock-ray was then used to divide hits on a vehicle’s turret or hull into 8 sectors. Each sector was evenly sized, covering 45 degrees of arc, to complete a 360 degree damage assessment. Hits on the vehicles were then collated as either Armor Piercing (A.P.) or Hollow Charge (H.C.), regardless of whether they penetrated or not.

The results shown in Table 10 clearly show that around 40% of all strikes from A.P. and H.C. weapons on the hull and 50% on strikes on the turret came from the front 45 degree sector, 22.5 degrees each side of the centre-line of the tank. In total, accounting for all strikes of any kind across this frontal arc (sector 1), this amounted to some 92 strikes out of a total of 241, 38.2% of all hits in this area. Expanding a look at the importance of focussing armor protection on a frontal arc can be done by including sectors 2 and 8 in this analysis. This would therefore cover the entire front aspect of the tank across both sides. Including sectors 2 and 8 to include hull and turret strikes by both types of weapon covers some 135 degrees, 67.5 degrees each side of the centre line of the tank. Hits in this area amounted to 155 hits, 64.3% of the total. Obviously, this leaves around a third of all hits (35.7%) accounted for across the remainder of the vehicle.
Looking purely at side hits square on (sectors 3 and 7), these accounted for 53 hits, 22% of all strikes. Using an expanded view of how the sides could be struck would include sectors 8, 6, 2, and 4. All together, the sides were exposed to fire and struck, even from oblique angles, to a total of 137 hits, 56.8% of the total.
From the rear, straight on (sector 5), just 12 hits were recorded, just 5% of the total. Even if this additional view of the vulnerability of the rear was taken into account and results from sectors 4 and 6 are added in, this would still only account for just 33 hits, 13.7% of the total. This expanded method of looking at the vehicle’s vulnerabilities was not done by the original authors, and it is easy to misunderstand how this may assist in viewing the areas commonly hit, as sectors get counted more than once and percentages count up to more than 100.

What it does show, however, perhaps more clearly than simple tabulations of X number of hits in Sector Y, are that the front is more likely to be hit than the sides, but not by much, 64.3% compared to 56.8%, and that the rear is by far the least important for protection, with just 13.7% of hits.


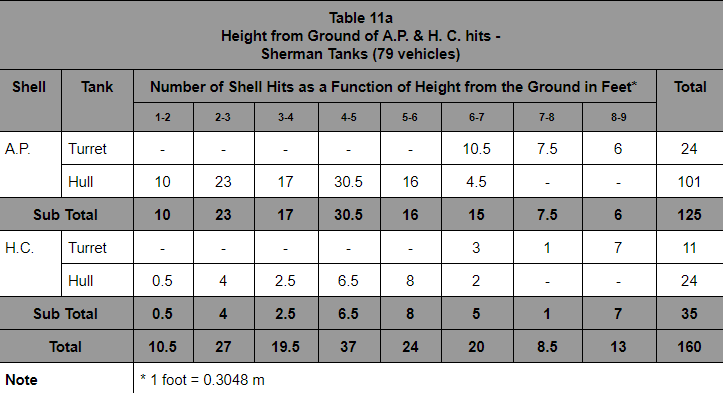
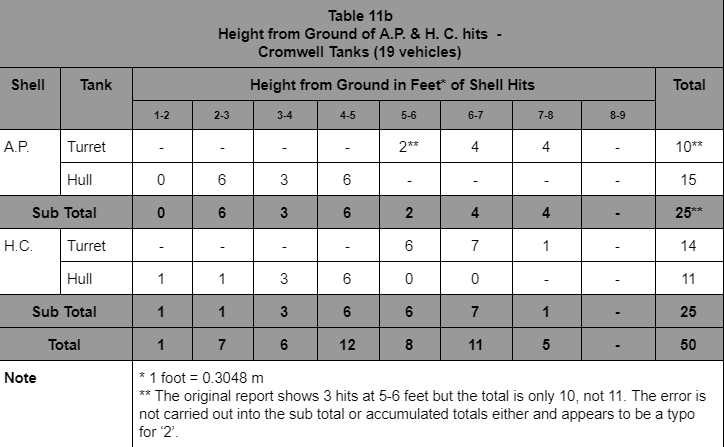
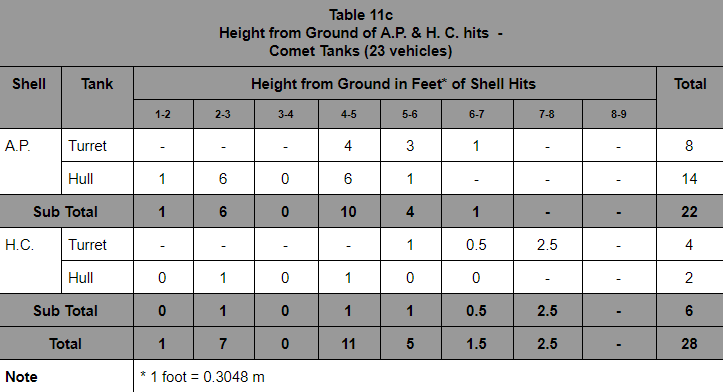
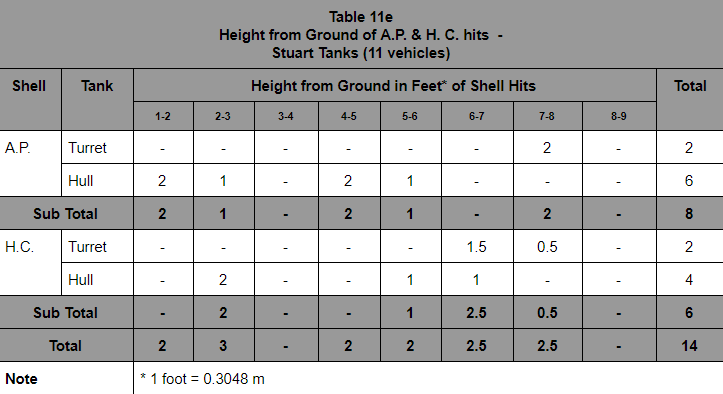
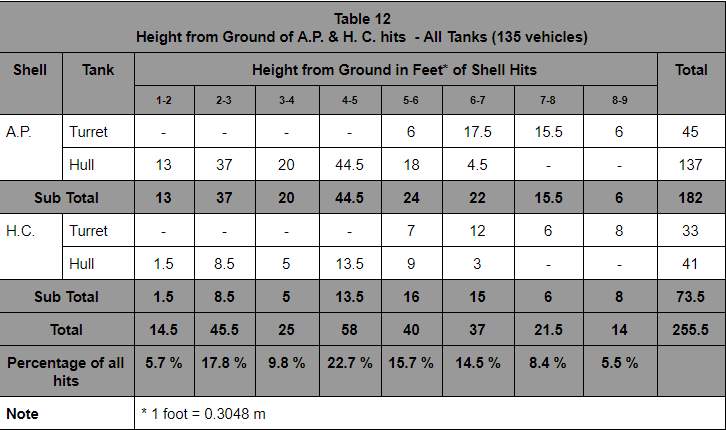
This was certainly not the limit of the hit-analysis by the authors of the report. In addition to knowing from what direction a tank was most likely to be hit in combat, something of use to future designers of such vehicles, the authors then looked at height. That is, the height from the ground on the tank where they were hit (Tables 11a to 11e) and then summarised (Table 12). The primary tanks concerned in the study, A.27 Cromwells and M4 Shermans, were different heights, with the M4 Sherman being the taller of the two (up to 2.97 m for the M4 Sherman vs 2.49 m for the A.27 Cromwell). Two hundred and forty tanks had been damaged by enemy Armor Piercing and Hollow Charge shells and had caused 326 men to be killed or wounded. This meant that the sample size was certainly large enough from which conclusions could be drawn.


Hit height analysis on the Cromwell (left) and Sheman V (right). The frequency of hits within a relatively small area in the centre of the turret face on the Cromwell and on the transmission housing and driver’s area on the Sherman V are particularly striking. Source: Author


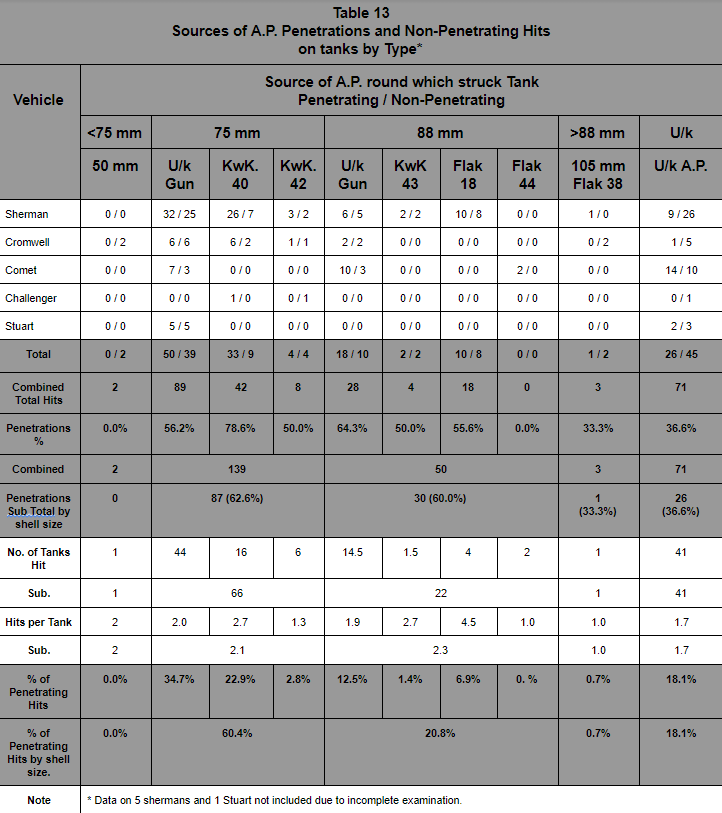
The examination of the shell damage from A.P. rounds provided additional information for the survey, because the penetrations and scoops left holes of varying sizes in the armor. Those holes could, in some cases, be directly attributable to a specific calibre of shell. On occasion, the enemy shell could be located as well and, in others, the source of the shell was seen or later identified looking at the captured battlefield. In this way of analysis, the authors were able to accurately or somewhat accurately ascribe to penetrating hits nearly two thirds of all rounds which hit the tanks, whether they penetrated or not (table 13).
Knowing the casualties from the tanks and then using this penetration analysis allowed the authors to accurately ascribe the risk of becoming a casualty based on the area in which a tank was penetrated (table 14).
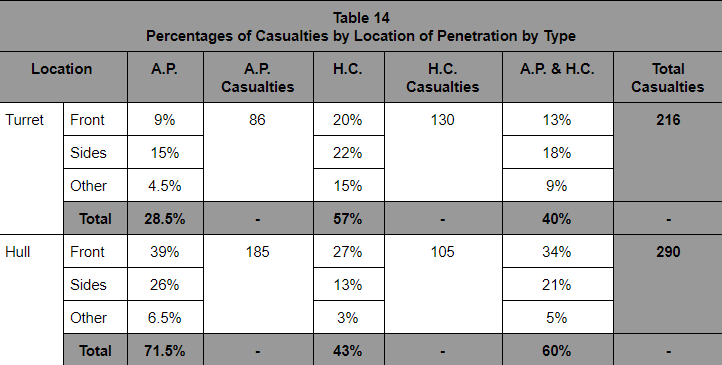
The conclusions were that penetrations through the front armor of the hull were the most likely to cause injuries, whether the result of A.P. or H.C., accounting for nearly a third of total casualties and 40% of casualties from a single A.P. penetration. The difference in the rate of casualties from hull and turret penetrations by A.P. is particularly striking.
Further to Table 13, where the guns firing A.P. rounds were identified, the authors were able to use evidence from the crews and wrecked vehicles for both sides to work out the ranges at which these A.P. rounds were being fired (table 14).
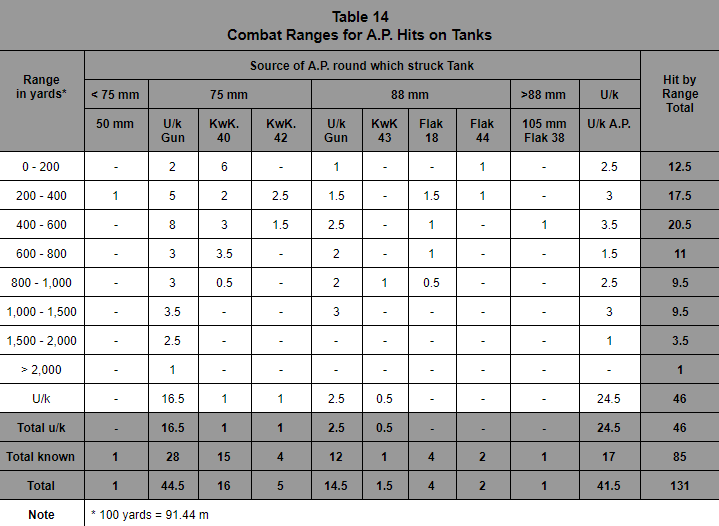
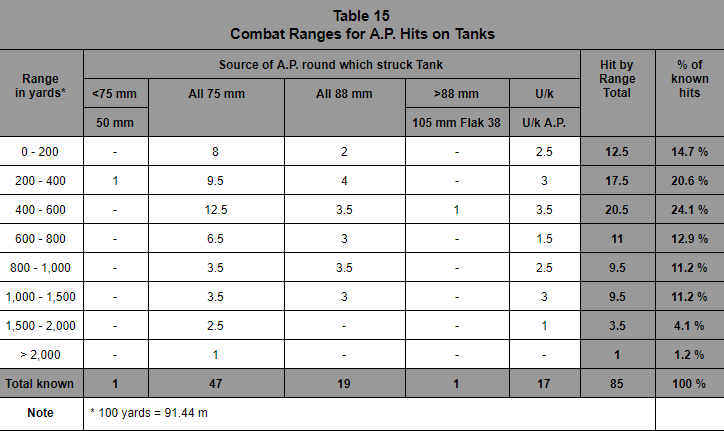
Of known hits, 85 of them for which the range could be accurately found, it was determined that 50.5 of them (59.4%) occurred at 800 yards (732 m) or less and 83.5% at 1,000 yards (914 m) or less.

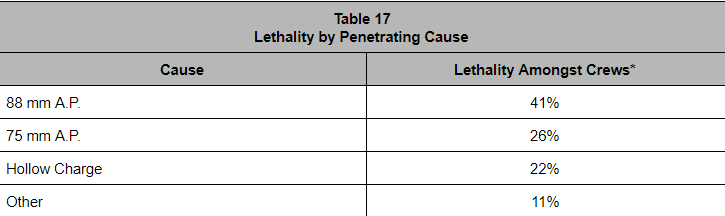
Having already identified that A.P. penetration was the primary cause of tank losses, the authors turned their attention to crew losses and the causes of them and this related directly to the penetrating agent. Table 16 shows that lethality was not even amongst the shells and that it was the larger, higher energy 88 mm shells which resulted in the most casualties. This assessment of the nature of the guns and their shells, combined with the combat ranges being encountered, meant that any consideration of improving the frontal protection of tanks, using the weight of armor to best advantage, had to take this into account (Table 17).
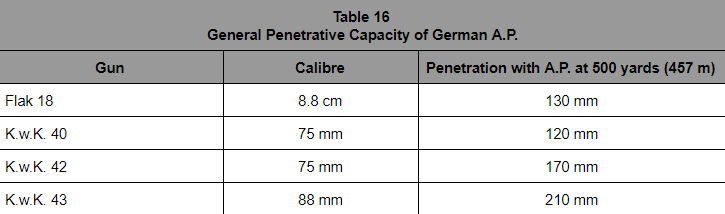
At best, the frontal protection on both A.27 Cromwell and M.4 Sherman was just around 100 mm, meaning that, at 500 yards (457 mm) from the front, both were penetrable by any of the commonly encountered German guns.
Worst still was that, at 500 yards (457 m), the evidence of combat showed that the chances of the German gunners missing their target was small, with survival chances for the crew halving every 6 seconds in a combat situation after the first round is fired. The implications of this were that a) the frontal armor had to be substantially improved on both tanks to make the armor invulnerable from that direction, and that b) the ability to deliver fire back at a target as fast as possible was of prime value.
The report went further than this too, and suggested that, as the majority of combat was forward or to the sides, all round traverse on a tank was not statistically a strict necessity. If, however, a tank could be made which was invulnerable to enemy fire from the front, even though it may have limited traverse, then the data supported that this vehicle would have substantial combat value (despite some limitations in supporting fire support for infantry) and improve survivability. In addition, as regarding potential future designs, the authors summarised this lesson as meaning that:
“if a vehicle of this type were designed in which the crew all worked from a sitting position, they could be protected from the front with a sheet of armor 7 feet [2.13 m] broad by 4 feet [1.22 m] high. Even if this were a foot thick, it would weigh only about 6 tons”.
In considering the effect of German guns, the combat ranges were generally relatively short and the 75 mm gun was also the cause of most tank losses, even though the 88 mm was substantially more injurious to the crew when it was encountered.
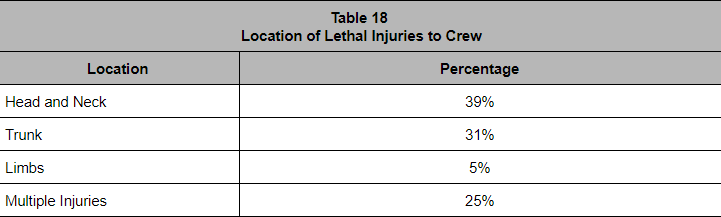
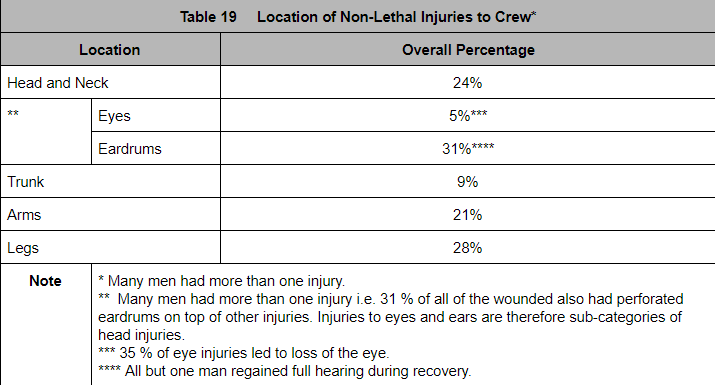
When these 88 mm rounds entered the vehicle, the fragments of armor and shell coming off, and the large round itself caused numerous injuries. Injuries were also caused further from the point of penetration than for a penetrating 75 mm shell. This was especially true of H.C. penetrations too, where injuries to the crew were tightly confined to the area near to the point of penetration. The primary cause of injury leading to death following penetration were wounds to the head or body (table 18). Non-lethal wounds were mostly to the limbs and head. With head injuries the most common amongst fatal injuries and one of the primary non-lethal injuries (table 19) the importance of head protection for tank crew was an obvious conclusion.
This analysis of fatal injuries by penetrative mechanism led into the second half of the study looking at crew casualties.
Crew Casualties
A vehicle casualty was defined for the purposes of the study as any A.F.V. hit by a weapon capable of causing major damage, which meant it would include anti-tank guns, landmines, etcetera, but not include small arms fire. Looking at tank crew losses in addition to the loss of the tanks themselves would provide insight into the relative dangers of the types of weapons to the men and to the mode of injury.
It had already been established that 34% (272) of all casualties were caused by single penetrations into the crew compartment and crews almost always immediately abandoned their tanks when it had been penetrated. It was noted that some even abandoned them when a penetration did not occur, as the follow up shot stood a high chance of doing so. It was also found that 3% (9) of all casualties were the result of penetrations into non-crew space, like the engine bay or final drive, and all were assessed to be the result of fires from the petrol igniting, although this was only recorded in Sherman tanks.
In one case, a 105 mm shell from a Flak 38 was recorded as having penetrated a Sherman in the side when it was exposed crossing a canal bridge. The round travelled through the crew space and blew out a 1’ (30 cm) square slab of armor from the opposite side as it passed right through both sides. The men inside were caught in a large and instant fire, burning all of them instantly. Only the driver and commander survived.
Just 9% (30) of the casualties were the result of non-penetrating hits. This was not due to any flaking of the armor on the inside face of the plates, but due to crews with body parts, like head or arms, exposed out of a hatch whilst driving.
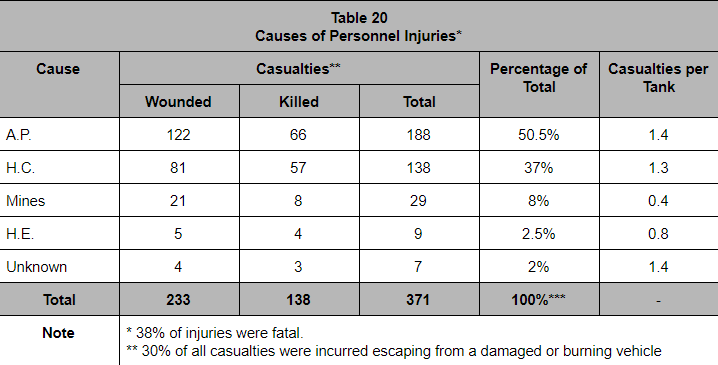
A total of 371 men were wounded or killed, with 38% of those who were injured being killed (table 20). This would then enable the authors to assign casualties to particular tanks (table 21) to assess the relative risk and safety of each one (table 22).
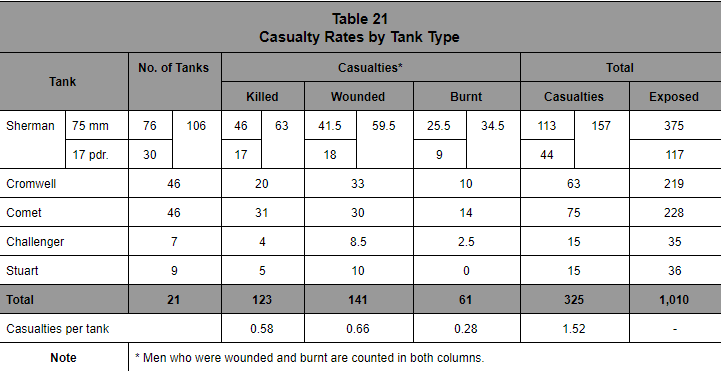
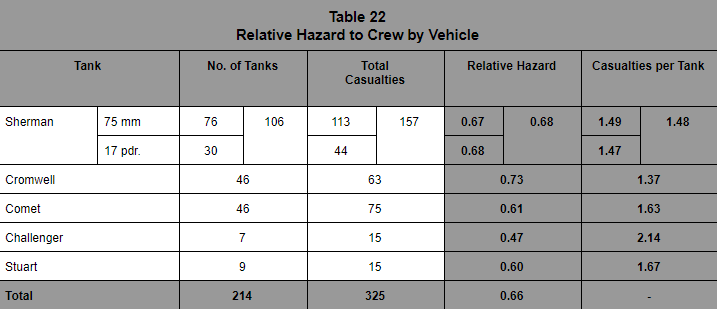
The relative hazard is a simple measure to look at the chance of becoming killed, wounded, or burnt inside the tanks used. It does not take into account the combat action seen by a unit, the idea that a particular tank might be specifically targeted by the enemy or a variety of other factors. One notable example of these other factors was that the 5-man crew complement was not always carried in A.27 Cromwells due to the increased risk of mine-related injury. Likewise, the Challenger and Sherman with the 17 pdr. omitted this crew member too. What can be drawn from the results, however, is a general idea that, during this period, the Sherman was in general marginally safer to be a member of the crew than the A.27 Cromwell.
Particular care has to be drawn in judging the relative hazards posed of the crews of 75 mm-armed M4 Shermans compared to 17-pdr.-armed Shermans. Although the crew complement in the 17-pdr. vehicles was just 4, the relative hazard here shows effectively no difference to the 75 mm gun vehicle, which could be interpreted to say that the 17-pdr. gun tank was proportionally more hazardous to the crew. Whilst the study did go on to find that there was an increased risk of injury to crew members from a hull penetration, the lack of a co-driver, who would not generally have been injured from a turret-penetration, does not get to be counted in the survivability of the tank because he was not there. Thus, the authors took care to suggest caution when interpreting the figures.
Fire, in particular, was a major problem to be considered for vehicle and crew casualties, the cause of the fire, and the type of incident which led to the fire. It was then considered in terms of penetrations by A.P. as to where on the tank the penetration had taken place and the percentages of men burned as a result (Table 23) to establish whether or not there was a difference in casualty rates between penetrations of the hull and penetrations of the turret.
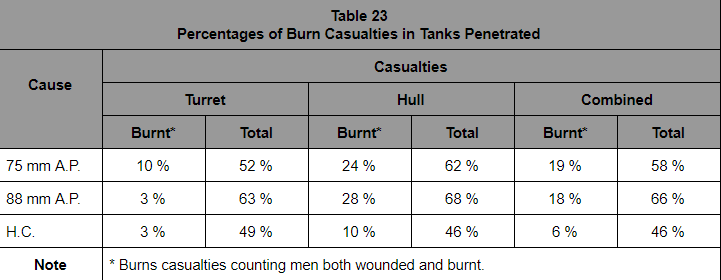
It is significant that the number of men who suffered burns was roughly the same between 75 mm and 88 mm A.P. penetrations into the hull, but that penetrations by 75 mm A.P. were more likely to lead to burn injuries when affecting the turret. Overall, however, the 88 mm A.P. was only marginally more likely to lead to burn injuries and a greater share of total casualties than the 75 mm A.P. The substantially greater energies involved with a hit from an 88 mm A.P. compared to a 75 mm A.P., would, on the face of it, have led to substantially higher numbers of burns injuries, but the conclusion was that this number was being masked by the increased fatality rate in tanks penetrated by that type of shell. The lower rate of burn casualties resulting from all H.C. penetrations was also notable. In a nutshell, penetrations by A.P. were substantially more likely to cause burn injuries than penetrations by H.C.
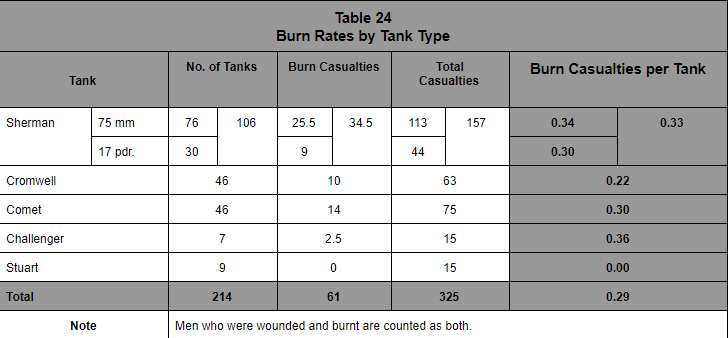
Considering this on a tank type basis allowed for a look at which tanks would be most likely, when penetrated by A.P., to burn and cause injury to the crews (table 24). The result was that, despite its reputation to crews for catching fire, the Sherman, when penetrated or catching fire, was not significantly more dangerous than the other tanks.

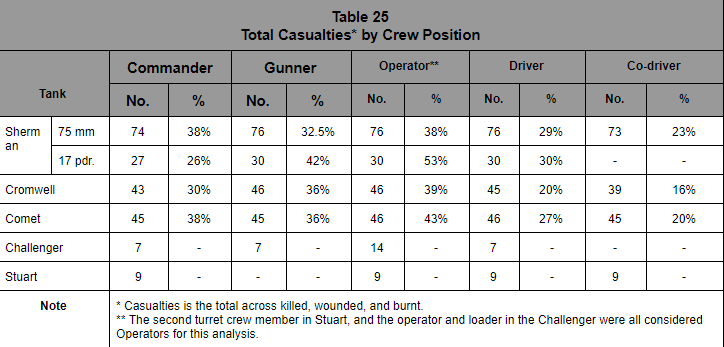
The risk of being burned was, in fact, more a function of where the crew were in the vehicle than to which vehicle they were in and this was established in table 25. In that table, it is clear that it is the commander, gunner, and operator who were most likely to be injured than the driver or co-driver. Some of this was due to the habit of entering combat with the hatches open on the turret (particularly for the commander) for observations or to aid evacuation in case of fire. The same was also true to an extent for the hull crew, some of whom were found to have been injured when driving with their heads out. One unit (unnamed) caused particular antagonism between crews and unit commanders by consistently going into combat with both driver and co-driver hatches wide open to ensure ease of escape in case of fire.
One final point on hatches noted that the Sherman escape hatches in the floor proved useful for collecting casualties under fire and that the side hatches in the Churchill provided the men a chance to escape from the tank with a modicum of protection from enemy small arms.
Fires
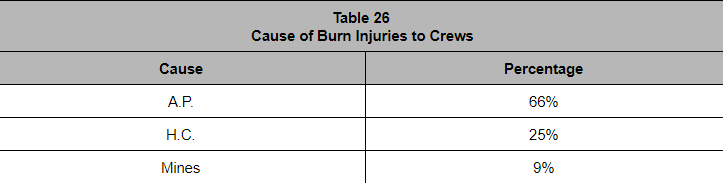
Fires after being hit and penetrated were substantially more likely when penetrated by an A.P. shell, especially if it was an 88 mm shell, and the risk of burn injuries to the crew was also significantly correlated (table 26).
A large cause of secondary casualties in tanks was found to be the result of ammunition catching fire and detonating. This was more prevalent in A.P. penetration of the tank than from H.C. penetration, with around 20% of A.P. penetration related casualties caused from this ammunition problem.
The suggested solution to ameliorate this was to use the additional armor, as applied on the Sherman sides around the ammo, in protecting the crew instead.
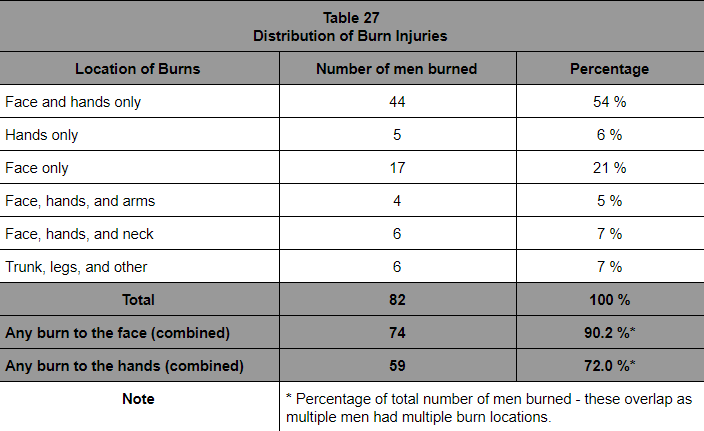
The majority of burn injuries to crews were to the hands and face (Table 27) – the parts exposed and not covered by clothing, and two-thirds of the burns were second-degree or less, meaning that men could usually return to duty (81% in fact) after treatment.
Fires started after penetration by H.C. weapons were often confined to the area near to where the penetration had occurred and burn risk was strongly correlated for the crew members next to the ammunition. Whilst all of the clothing worn by tankers proved to burn at some point, no easy conclusions were forthcoming on the most suitable clothing other than it should be fireproof and cover the man’s body and limbs. More important from a statistical point of view for reducing casualties was that any tank coverall should be in a camouflage material, such as the Denison pattern paratroopers smock, in order to reduce the casualties to crew exposed to enemy small arms when getting out of the tank.
Burn injuries to crews were found to be three times more common in vehicles penetrated by 88 mm and 75 mm A.P. rounds than from hollow charge weapons. Importantly, however, the study had also found that “The incidence of burns was not significantly greater in Shermans than in other types of vehicle”, something contrary to popular myth.
The study also investigated whether injuries could be the result of delays in escape from the tank. It had been found in experiments on escape times for the M4 Sherman and A.27 Cromwell that both vehicles took about 2.5 seconds for the commander to get out of his open hatch to a standing position on the turret roof (an experiment, so standing on the roof was simply there to standardise the time without worrying about a transit time for the crew member to the ground). The gunner took 5 seconds to do the same and this was considered to be roughly the same for the Comet. The gunner, therefore, was exposed to an internal fire for twice as long as the Commander and this was reflected in the real life casualty figures from Operation Veritable in the report.
This was an enormous take away for the report. Experiments had shown a potential problem and this had been borne out in real life combat analysis. The recommendation was that time to escape from a burning tank must be kept to 2.5 seconds or less to avoid burn injuries and 2.5 to 5 seconds to avoid men being burned to death. It was found to take 1-2 seconds just to open a hatch and these were supposed to be closed in combat, especially for the hatches other than the Commander’s. The authors strongly recommended the adoption of an instantaneously opening hatch to expedite crew evacuation in a fire.
65% of the commanders and just over 20% of operators who were casualties were wounded directly as a result of being exposed through an open hatch. Between 14% and 20% of those casualties were directly attributable to small arms fire because they were exposed, although this was reduced for tanks whose crews had improved splash shields around the hatches for the men.
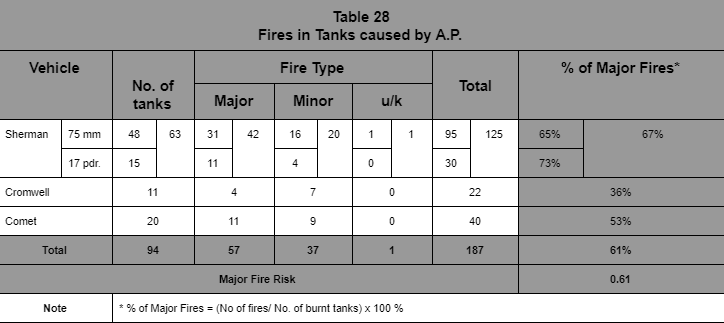
One experimental device mentioned by the authors was the ‘fog apparatus’. Automatically triggered by an internal fire, this device extinguished fires within two seconds and, although it was available during the Operational period investigated, it clearly had the potential to substantially reduce the fire-casualty risk inside the tanks. However, the authors went one step beyond that point too. As the majority of penetrations (particularly by A.P. shells) led to fires (Table 28), they suggested that the ‘fog apparatus’ should be triggered not just by a flame detector, but primarily by a penetration detector. The problems of the apparatus being triggered by a penetration even when there was not a fire was a small price to pay to increase the chances of the crew getting out in time.
In terms of a major fire, that is a fire which destroyed the entirety of the tank and contents in both engine and crew compartments, these were the worst kind and led to the most injuries. This was in contrast to the minor fires, which were tightly contained to just a single compartment or section within a compartment and caused localised or minor injuries.
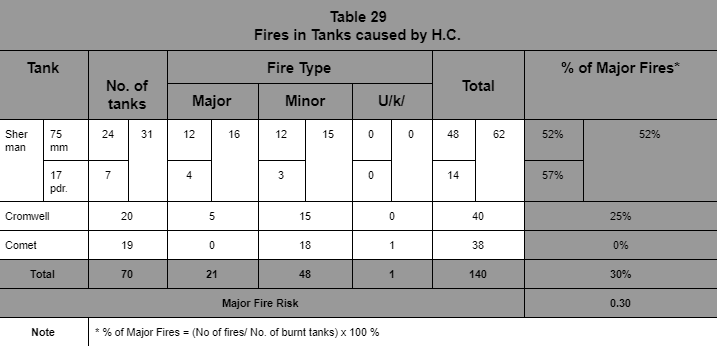
Despite the report concluding that the Sherman was at no greater risk of a fire than the other vehicles, the data showed a significant difference between the M4 Sherman and A.27 Cromwell, and to a lesser extent, with the Comet, for a relative risk of major fires following a hit by an A.P. shell. The Sherman was nearly twice as likely to suffer a major fire after such a hit than the A.27 Cromwell, and this remained the same for H.C. penetrations (Table 29).
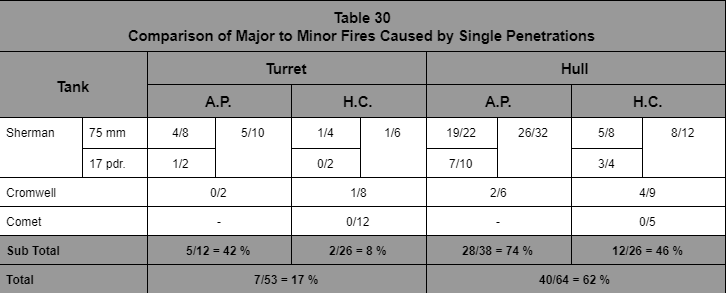
A.P. penetrations created a risk of a major fire on average at a rate of 30.5% of penetrations and 61% of all major fires across the tanks. H.C. penetrations, on the other hand, caused a major fire at a rate of just 15.0% and accounted for only 30% of all the major fires. This was regardless of where the vehicle was hit or penetrated although, as previously established, penetrations into the Sherman’s engine bay stood a greater chance of leading to a fire than for other vehicles and that hull penetrations caused more burn injuries than turret penetrations (Table 30).
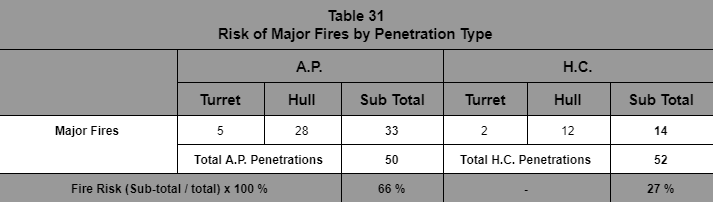
Adding up all of the major fires caused by A.P. and H.C. from Tables 28 and 29 provides for the final delineation between the relative major fire risk from penetrations by A.P. and H.C. and clearly shows the substantially higher risk from A.P. penetration (Table 31).
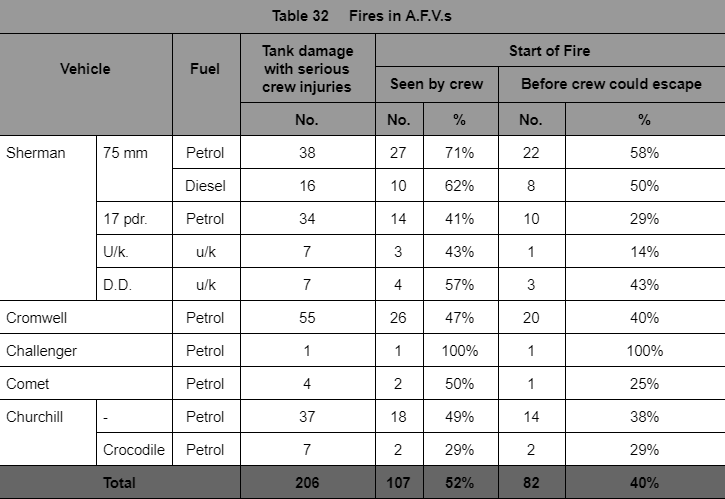
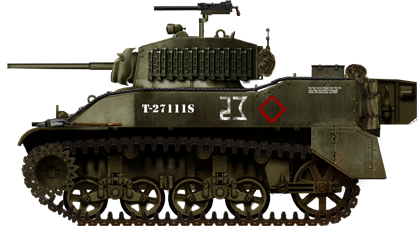
Although many fires were associated with the petrol inside the tanks catching fire, this was primarily a concern for engine-bay penetrations and especially so for the M4 Shermans, although it was only a minor cause of burn injuries. Despite this, looking at the number of fires which occurred in M4 Sherman tanks, the difference in diesel vs petrol engines versions was stark (Table 32). More fires, and fires which happened more quickly, giving the crew less time to escape, occurred in petrol-engined M4 Shermans than in diesel engined ones, with the obvious exception of the 17 pdr. armed vehicles, for which no clear explanation presented itself. Comparing the 75 mm-armed M4 Sherman with a petrol engine to the A.34 Comet or even the A.22 Churchill, both of which also had petrol engines, confirmed the additional fire risk from a petrol-engined vehicle. The Sherman with the petrol engine was simply more likely, after being hit, to have a fire start with little or no warning than either its contemporary tanks (the single data point for the A.30 Challenger here provides no insight), such as the A.27 Cromwell, A.34 Comet, or even A.22 Churchill, even the A.22 Churchill with the flamethrower which had extra fuel lines and a large bowser on the back – the Crocodile. Table 33 sums up these differences with a contrast readily apparent between the 75 mm armed M4 Sherman with a petrol engine and diesel engine, whereby ammunition fires accounted for ⅔ of all known fires in the petrol vehicle and the petrol accounting for the other third, compared to the diesel engined vehicle, with zero fires known to be connected to the fuel.
The major cause of fires and casualties was actually burning ammunition propellant from ruptured shell cases. This is particularly hazardous in the case of an Armor Piercing shell-casing, as it has a greater quantity of propellant inside and liberated enormous amounts of energy extremely quickly when burned. The combustion of the ammunition was also considered a secondary hazard by the authors of the report, as exploding ammunition inside the tank also led to other casualties. Ammunition stored in the crew compartment caused 19% of all related casualties and 16% of all A.P. and H.C.-related penetrations.


Conclusion
The study into these losses covered a statistically significant sample size of both men and vehicles in a relatively discrete time during this one operation. It does, however, warrant caution, as a report from which too wide of a conclusion may be drawn for the whole war. This was 1945 and Germany was collapsing, so the data here cannot be taken as reflective of combat in general.
There are, despite this reserve, some significant points which can be taken away. When it came to a threat to Allied tanks, the most significant threat was from enemy A.P.-firing weapons and H.C. weapons like the Panzerfaust. The majority of enemy gunfire was directed at the front of the tank and a negligible amount at the rear. The majority of casualties, both direct and indirect, were the result of penetrations of the armor by A.P. hits.
The majority of tank casualties were the result of fire from 75 mm guns, yet the 88 mm gun caused more fatalities per penetration and caused more fires. The general combat range for guns was under 1,000 yards (914 m) and mines generally were not a concern, although floor protection on the A.27 Cromwell was also inadequate.
Fires were mainly the result of ammunition burning or exploding (also a source of secondary injury). The conclusion drawn from both of those points was that the front of the tank should not only carry the majority of the armor, but also that adding additional armor on the sides of the M4 Sherman to protect the ammunition was better utilised directly on the front of the tank and also in protecting the crew from the ammunition inside.
Despite the report concluding that M4 Shermans were not generally more at risk of fires than other tanks, the data showed somewhat otherwise. The petrol engined M4 Shermans were more likely to have fires start with little or no warning than the diesel equivalent or even their petrol-engined contemporaries. Notwithstanding that, ammunition was cited as the primary cause of fires, the preponderance of petrol-engined 75 mm M4 Shermans to burn is not to be ignored.
Also for armor, the study, despite not being able to look directly at A.22 Churchill tanks, suggested that, due to the heavier armor, these suffer fewer casualties amongst men who were only partially exposed in those vehicles but the sample size was not large enough to make a determination on the point. When it came to penetration of the A.22 Churchill, it showed no more survivability for the crews than the other tanks, producing the same ratio of killed and injured.
It was also clear that the distribution of armor on a tank to protect against A.P. fire had to be differently emphasized on a vehicle to protect primarily against H.C. weapons and that the fatal effects inside the tank were more severe following an A.P. strike than from an hit by a H.C. weapon.
For the crew, they must be kept as far from the ammunition as possible, notwithstanding any efforts at fire suppression or efforts to protect the ammunition from damage. Further, the predominance of head injuries both fatal and non-fatal demanded action on ballistic head protection. The need to evacuate in a fire was extreme – all crew had to be able to egress the tank within two seconds and current hatches were grossly inadequate for this across all tanks.
What the series of reports tells is a complicated yet thorough assessment of survivability. The M4 Sherman tank was, in fact, more likely to burn following penetration than other tanks and some of that was indeed due to the petrol in the engine bay catching fire. The large majority, however, were not – they were, like the majority of fires in other tanks, a function of the ammunition burning inside.
The height of a tank was a factor in reducing the vulnerability to being hit by enemy fire but the additional height of an M4 Sherman over an A.27 Cromwell accounted for relatively few hits and penetrations. With the height being dominated by the turret, this also resulted in few injuries proportionally.
As far as reducing height went, attention should therefore be on reducing hull profile rather than turret or overall profile for survivability from a height point of view.
It is interesting to note, from a historical point of view, the statistical analysis of tank and crew losses indicated to the designers that a tank, even with limited gun traverse, emphasising armor immune to enemy fire from the front, could have substantial combat value. Comparing this to the decisions by the Germans in these later years of WW2 is interesting, with increasingly heavily protected S.P.-type guns, including the Jagdtiger. It should be noted however, that the key difference between the British lessons and the German practice was that the British wanted a seated crew in the hull rather than a giant casemate type design with men standing inside it.

Sources
Hills, A. (2021). An Unnecessary Burden. The Sherman Tea Tray Anti-Land Mine Device. FWD Publishing, USA
Medical Research Council Report BPC. 45/444. (1945). Casualties among Tank Crews in 11th Armoured Division in Operation Veritable. 27th February to 4th March 1945. Captain H. B. Wright and Captain R.D. Harkness, Royal Army Medical Corps.
Medical Research Council Report BPC. 45/419. (1945). The Distribution of Casualties Amongst the Crews of Cromwells and Shermans. Captain H. B. Wright and Captain R.D. Harkness, Royal Army Medical Corps.
Medical Research Council Report BPC. 45/453. (1945). Casualties In Armoured Fighting Vehicles. Captain R. Mayon White.
Medical Research Council. (1946). A Survey of Casualties Amongst Armoured Units in North West Europe. Captain H. B. Wright and Captain R.D. Harkness, Royal Army Medical Corps.
Official History of the Canadian Army: The Victory Campaign. Chapter XIX: The Battle of the Rhineland Part II. Canadian Department of National Defense. Ottawa, Canada.
US Army Technical Manual ™-E-30-451. Handbook on German Military Forces. March 1945
One reply on “British Tank Losses March to May 1945: The War in North West Europe”
A great article,but as an ex(cold war)Inniskilling,I don’t think the term “battalion”is ever used.Squadron,Troop,all old cavalry terms are commonplace.Also there has ,as I believe never been a “2nd Inniskilling”Regt.The correct term for the Regiment is the 5th Royal Inniskilling Dragoon Guards