 Commonwealth of Australia (1942-1945)
Infantry Tank – 400 Delivered
Her Majesty Heads East
By 1940, the Matilda II Infantry Tank had made a name for itself in the western deserts of North Africa, aptly earning the moniker of ‘Queen of the Desert’. However, by 1941, the Matilda II had fallen behind the increasing pace of desert warfare in terms of mobility and firepower. The Matilda II was gradually being replaced by the cheaper and equally as effective Valentine infantry tank. The career of the Matilda II would not end here however.
In early 1942, the situation in the Pacific had grown dire. The Japanese empire had overrun much of the British territory in the region and, by February, the Japanese advance had extended far enough south that Japanese airpower could launch aerial attacks directly against the Australian mainland.
Australia, for its part, had recognized the need for tanks in the second Australian Imperial Force and had planned on raising a full armored division by the end of 1941 with plans for an additional two armored divisions to follow. The problem was the availability of such vehicles. The locally designed Australian Cruiser tanks had only just been produced in prototype form and, with the Japanese now in control of some of Australia’s closest neighbours, the need for tanks was urgent.
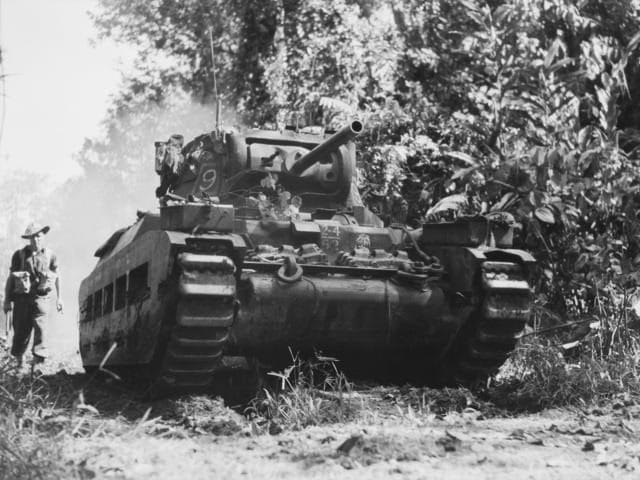
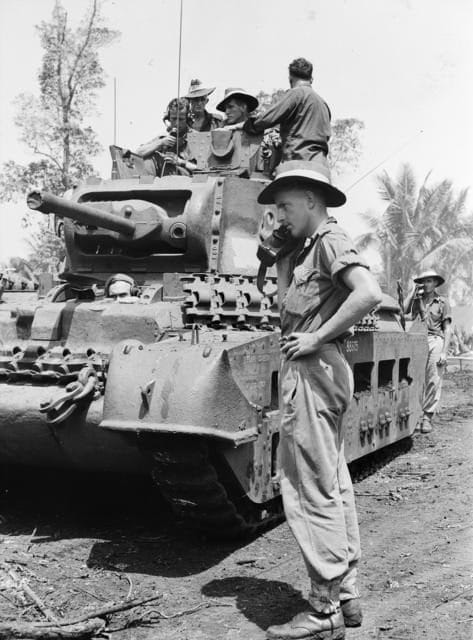
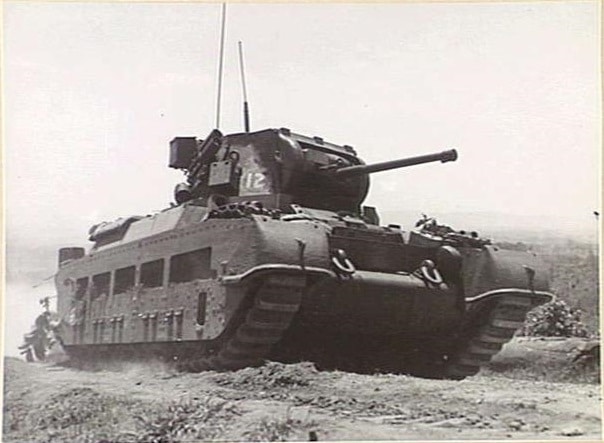
Matilda II tank of 9 troop ,B Squadron, 2/4 Armoured Regiment, moving along a track in the Hatai junction sector. Bouganville. 17 May 1945 -Source: Australian War Memorial
By mid-1942, just over 200 Matilda II tanks had arrived in Australia, although roughly half of these had to be cannibalized for parts to maintain the remainder of the fleet. Realizing the increased importance of close support in jungle fighting, additional tanks fitted with 3’’ (76.2 mm) howitzers were obtained from New Zealand stocks in exchange for a corresponding amount of 2 pounder gun tanks. The 3’’ howitzer tanks were employed as troop leader’s vehicles and usually took point during advances, supported by one or two 2 pounder gun tanks.
Close to 400 Matilda II tanks would ultimately enter Australian custody. They would continue in Australian service until the end of the war, making the Matilda II the only British tank to see continual service from 1939 until 1945
Markings and details
The Royal Australian Armoured Corps typically followed British practice in the marking and detailing of their vehicles. However, some local variation did inevitably arise and many of the trends instigated in the Second World War (such as the naming of vehicles) continue to be used by the Royal Australian Armoured Corps (RAAC) to this day.
Formation sign
Following British practice, all Australian vehicles displayed an 8×8 inch insignia denoting the formation that they were part of. In the case of the Australian Matilda II tanks, all operational units were from the same formation, the 4th Armoured Brigade Group. The insignia of 4th Armoured Brigade Group was a white palm tree over a crocodile and a boomerang on a black background. All tanks displayed two formation signs, one located frontally next to the unit sign and the driver’s viewport, with the second located between the external fuel tank brackets on the rear of the tank.
Arm-of-Service sign
The Arm-of-Service sign identified a vehicle based on its regimental type within the greater formation (in the case of Matilda II tanks, Armour). Two different types of Arm-of-Service signs could be seen on Australian Matilda IIs. The first type, implemented in 1943, followed the British vehicle marking system. This consisted of a white number 51 on a red square and was painted on tanks of the 1st Army Tank battalion (later 1st Armoured Regiment) in New Guinea.
The second type was locally developed and implemented after 1943. It consisted of a white fraction sign of the regimental number over a numerical designation of the unit type. For example, the 2-4 Armoured Regiment was displayed as 2-4/52 (52 designating armored regiment), while the 2/1 Armoured Brigade reconnaissance squadron was displayed as 2-1/214 (214 designating reconnaissance squadron).
Arm-of-Service signs were painted on the front and back of the vehicle, next to the formation sign, except for the Frog flame tanks, on which the rear sign was displayed on a vertical plate attached to the right-hand rear track guard. Official policy was that the fractional type Arm-of-service sign was to be painted on a green square, however, it appears that in some instances it was painted directly onto the base paint of the vehicle.
Squadron insignia
In common with British practice, Australian armored vehicles were marked with a colored insignia comprising of a number inside a geometric shape which indicated the vehicle’s regiment, squadron and troop. The color designated the regiment; 1st Armoured Regiment (red), 2/4 Armoured Regiment (yellow), 2/9 Armoured Regiment (blue), 2/1 Armoured Brigade Reconnaissance Squadron (white).
The shape designated the squadron; A squadron (triangle, point up), B squadron (square), C squadron (circle), Regimental HQ (diamond), armored brigade reconnaissance squadron (triangle, point down). The number inside the shape designated the squadron which the tank was part of. For instance, a tank displaying a red square with the number 9 would be from 9 troop, B squadron, 1st Armoured Regiment. These insignias were displayed around the turret at three points, on both turret cheeks and the rear of the turret.
Restored Matilda II tank showing Australian markings for 10 troop B squadron 2/4 Armoured Regiment. 1.squadron insignia (troop number) 2. squadron insignia (Squadron shape and Regiment color) 3. Formation sign for 4th Armoured Brigade Group 4. Arm of service sign. 5. Bridging weight sign. Source Gizmodo
War Department numbers and embarkation markings
The War Department numbers were the registration numbers of the tank, beginning with a capital T, although this was not displayed on the vehicle. The War Department number was painted in 3-inch-tall white lettering above the center mud chutes of the tank’s side plate. It should be noted that in some unit specific cases, there was some variation in the placement of the numbers, either on the angled section of the upper side plate or on the front and rear of the vehicle.
The embarkation numbers consisted of a 5-digit code accompanied by a 3-color bar, with the colors corresponding to the last 2 digits of the code. The embarkation codes were derived from British practice to allow for easy and orderly loading of equipment onto shipping and thus ensuring that regimental vehicles were grouped together for delivery to the front.
Fording and bridging markings
The fording markings are one of the most distinctive visual markers of an Australian Matilda II and were intended to provide crews with a visual aid for the water depth at which the tank could safely and effectively cross. They consisted of two red lines approximately 1-inch-high on each side of the tank, the lower marker painted just below the top of the mud chutes and the higher marker a few inches above it.
Each line was labeled with white lettering reading ‘Flaps open’ for the lower marker and ‘Flaps closed’ for the higher marker. In some cases, the words ‘fording height’ were also present near or interrupting the higher line. The bridging marker indicated the weight limit of the bridges which the Matilda II could safely cross. It consisted of a yellow circle containing a black number 25, indicating the Matilda II’s bridging weight of 25 tonnes. The bridging marker was painted on the front of the tank, either to the right of the driver’s viewport or on the front of the right-side tool box.
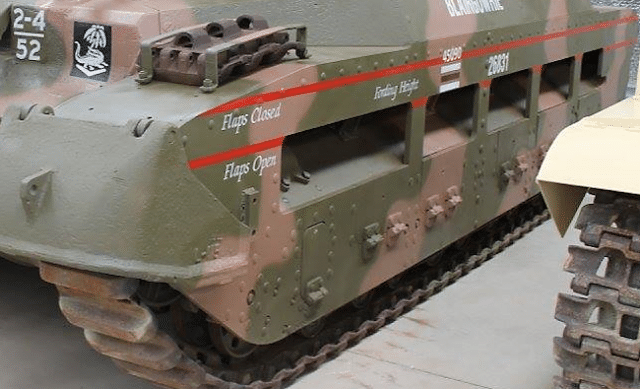
Fording markings on a restored Australian Matilda II tank. Source: The Australian Armour and Artillery Museum
Names and miscellaneous markings
Matilda II tanks in Australian service were frequently, but not universally, painted with identifying ‘names’ on the angled side plate of the hull. Vehicles were named per the letter initial of their squadron. For instance, tanks of C squadron would have names such as ‘Courageous’ while tanks from A squadron would have names like ‘Asp’ or ‘Apache’. The name for each vehicle was typically selected by its crew, and the Australian soldiers (colloquially named diggers) often expressed themselves through humor or other creative choices.
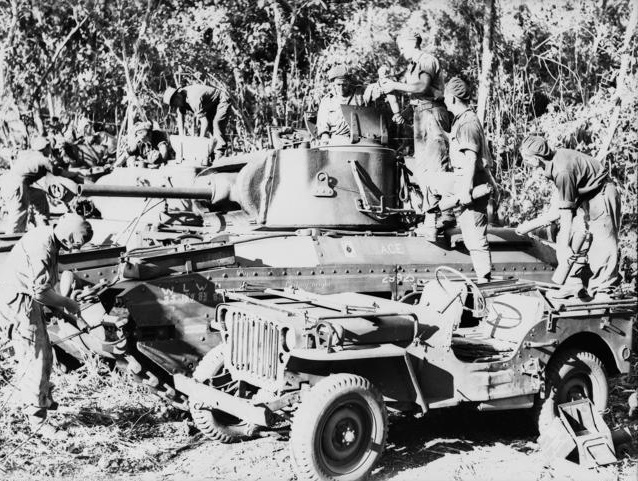
The Matilda Frog tanks appear to be the exception to the rule of tank names starting with the squadron letter. For instance, a Matilda II Frog Flame tank operating with the 2/9 Armoured Regiment was named ‘Devil’ by its crew, despite there being no D squadron, while another was named ‘Charcoal’. Some crews also went to additional levels of detailing their tanks, such as tank T29923 ‘ACE’ which was also painted with a small Ace of Spades playing card to the left of its name. Crews also sometimes scrawled personalized slogans onto their tanks, such as one vehicle bearing the inscription ‘Cop this’ above the coaxial machinegun. However, these markings appear to be less frequent.
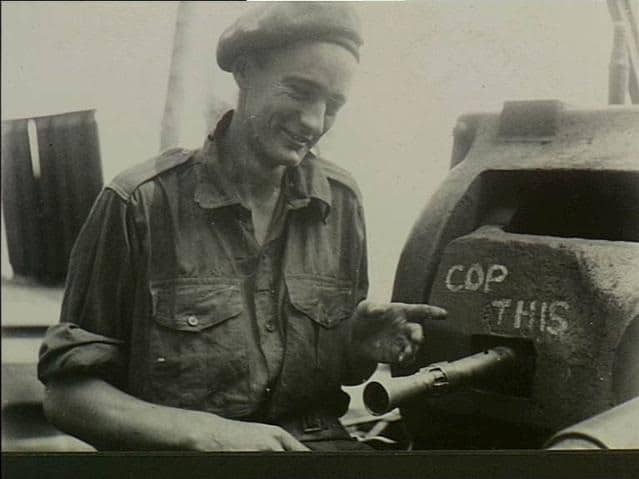
Trooper R.Fox pointing to the markings on the turret of his Matilda II tank. Huon Peninsula, New Guinea. 26 February 1944 -Source: Australian War Memorial
Modifications and experimental work
In response to local conditions prevalent in Australia and the Pacific, several modifications were implemented to Matilda II tanks in Australian service. These modifications were often applied at a regimental level, in response to the conditions each regiment was facing and, while useful for identifying Australian Matilda IIs, they were not ubiquitous.
Wireless and tank phones
The Second Australian Imperial Force first deployed tanks to the Pacific during the battle of Buna-Gona in December of 1942. Prior to Buna, Allied commanders had erroneously believed that tank and battery strength artillery support was not viable in a jungle environment, instead attempting to fill the lack of substantive fire support with air support and man-portable light artillery, such as mortars. The 19 available M3 Stuart light tanks were hastily rushed to the front and were not suitable in terms of design or equipment for jungle fighting.
Despite its valuable contributions to breaking through Japanese positions, one of the greatest flaws of the M3 Light at Buna was the incompatibility of the tank radios with the infantry wireless sets and lack of external infantry telephones. This meant that the infantry was unable to easily coordinate with the tanks and forced soldiers to brave Japanese machinegun fire and tree-top snipers to ride on the rear deck of the tank and direct the commander through the pistol ports.
Considering this, Australian Matilda II tanks underwent modifications to the radio position within the turret to allow for a locally produced modified MK 19 wireless set to be fitted. Additionally, tanks were fitted with a headset and microphone receiver on the rear deck of the vehicle, which allowed infantry to communicate with the tank crew, although this was later replaced by a more standard infantry phone. US produced ‘Walkie Talkie’ radio sets were also used by officers to direct fire from Matilda II tanks against Japanese positions, with many tank commanders frequently dismounting to fulfill forward observation duties for the troop.
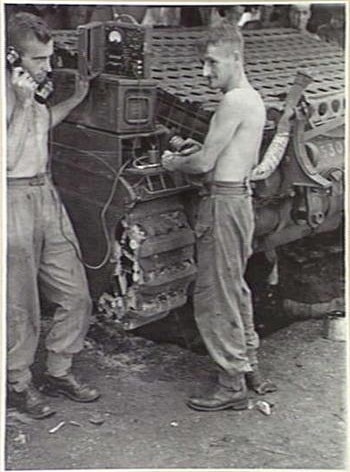
Corporal R Stoddart and Seargent J R Edwards of 3 Troop, 2/9 Armoured Regiment testing the infantry phone of a Matilda II tank. White beach area, Morotai. 22 May 1945- Source: Australian War Memorial
Corporal E.G.Molyneaux netting a wireless set no 536 ‘Walkie Talkie’ to a Matilda II tank of 8 troop, B squadron, 2/9 Armoured Regiment. A soldier can be seen in the background testing the infantry telephone. White beach area, Morotai. 21 May 1945 – Source: Australian War Memorial
Track idler guards and turret ring guard
In operations in New Guinea in 1943, it had been demonstrated to both sides that the Japanese lacked an AT gun sufficient to penetrate the main armor of the Matilda II. Having realized this, the Japanese began to focus on disabling the Matilda IIs by targeting the few vulnerable points on the tank, namely the track idlers and the turret ring. Targeted shots from Japanese 37 mm (1.46 in) AT guns were sufficient to smash the track idler and its surrounding plate as well as jam the turret mechanism, leaving the tank vulnerable to infantry attack with magnetic bombs or by lighting a fire under the tank.
To protect against fire from Japanese AT guns directed against the track idlers, armored guards were provided. The idler guards were cast from Australian Bullet Proof Plate 4 (ABP4) armored steel, the same steel developed for the AC I Sentinel tank, to a thickness of 1 7/8 inches (47mm). The guards were attached via a hinged mounting welded to the track guard, allowing the guards to be raised out of the way for track tensioning and other maintenance. A bump stop was also fitted on the side of the tank to prevent the guard from fouling the track while moving cross country.
In order to protect the turret ring of the tanks, a collar of rectangular armored plate was fabricated and welded to the hull of the tank starting at the driver’s hatch and encompassing the side circumference of the turret but open at the rear. This armored collar was visually similar to that featured on the experimental A27 turreted Matilda II, and some sources claim that hulls fitted with the collar were delivered to Australia from stock intended to mount the A27 turret. Conversely, photographic evidence shows turret collars being welded on locally.
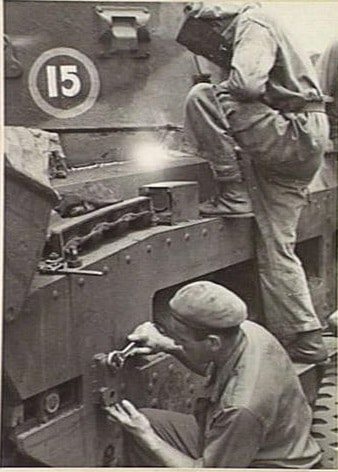
2/9 Armoured Regiment personnel fitting a turret ring guard onto a Matilda II of 15 troop, C squadron, during a post-exercise vehicle overhaul prior to deployment. The track idler guard has been lifted and is visible on the left-hand side while a trooper can be seen adjusting the bump stop with a shifting spanner. Wondela Queensland, Australia, 27 December 1944 – Source: Australian War Memorial
A Matilda II of 12 troop, C squadron, 2/9 Armoured Regiment fitted with track idler guards on exercises prior to deployment. Malanda area, Queensland, Australia. 11 December 1944 – Source: Australian War Memorial
Grenade protection and improvised armoring
In the closing stages of the war, Australian armored units were faced by an increasingly tenacious and desperate Japanese foe who, bereft of suitable conventional anti-tank weapons, began to use increasingly creative (and in some cases, borderline suicidal) means to defeat Australian tanks. Previous experience had revealed the risk of Japanese infantry attacks utilizing Type 99 magnetic mines and grenades thrown onto the back of the tank.
While these weapons were not sufficient to penetrate the main armor of the tank, they could damage the thinner engine louvers and the automotive components behind them, potentially leaving the tank immobilized and vulnerable to further close attack. To protect against the bomb threat, Australian armored regiments in Borneo began to improvise anti-grenade screens to protect the rear of their tanks in 1945. The anti-grenade screens were constructed from different materials depending on the regiment in question and typically conform to two types.
The first consist of repurposed pierced steel landing planks (also known as sand channels) formed into a conjoined plate and placed above the engine louvers, supported by a frame of steel tubing. Additional plates were also placed around the engine area and wire mesh was used to fill gaps around the perimeter of the main plate. This type of protection was implemented on vehicles belonging to the 2/9 Armoured Regiment.
The second type consists of a wire mesh mounted above the engine louvers. In some cases, this was supported by a frame of steel tubing. In other cases, additional mesh was bent or welded around the sides to form angled supports. This type was used on tanks of 1 Armoured Regiment and 2/4 Armoured Regiment.
Spare tank tracks were also liberally affixed to the hull to act as extra armor. It is debatable as to just how effective this track armor was, however, by 1945, the practice was common throughout the active regiments of the 4th Armoured Brigade Group. Typically, the spare links were attached to the tank around the driver’s compartment on the angled side plates and, in some cases, on the glacis plate. The track links were welded onto the hull in strips, usually with the horns facing outwards, although in some cases the tracks on the glacis plate appear to be attached to some form of crossbar between the track guards, presumably so as not to interfere with the driver’s viewport and the tool boxes.
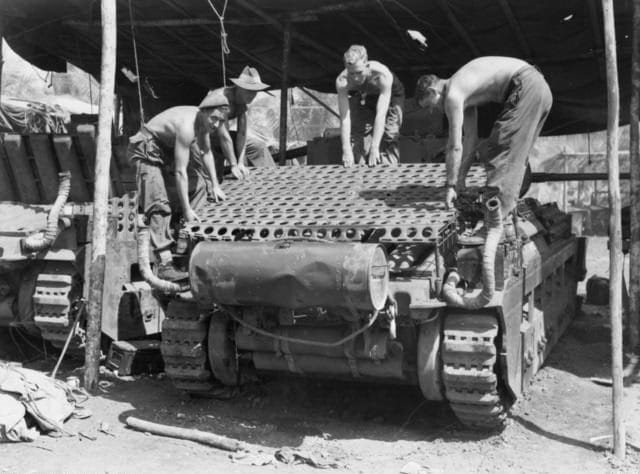
Personnel fitting perforated steel anti-grenade plates to a Matilda II of 2 troop, A squadron, 2/9 Armoured Regiment. Morotai 21 May 1945 – Source: Australian War Memorial
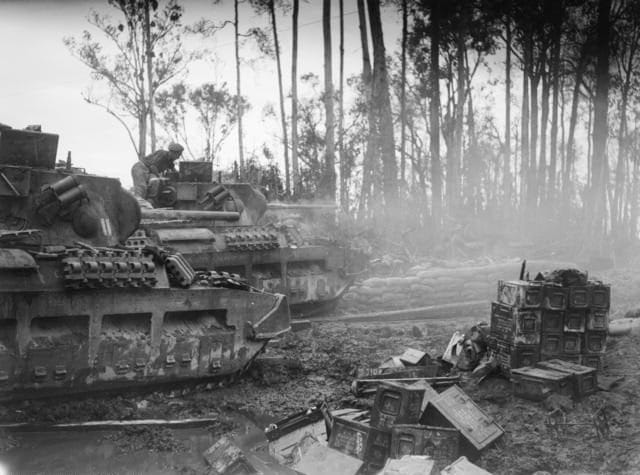
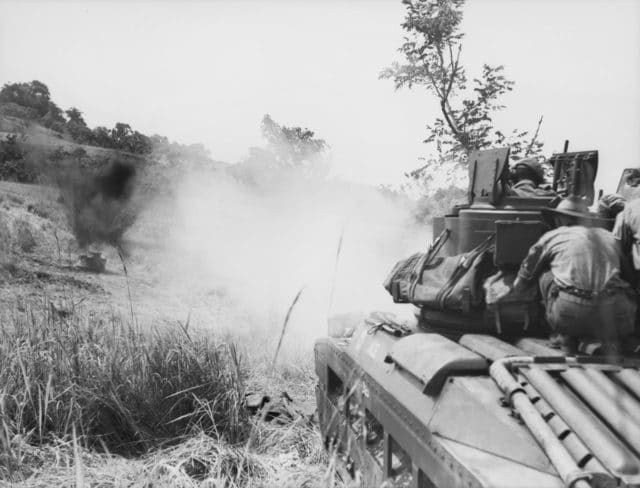
A pair of Matilda IIs from C squadron, 2/9 Armoured Regiment engaging a Japanese position. Both have been fitted with spare track links for extra armor. The tank in the foreground is armed with a 3’’ (76.2 mm) howitzer while the tank behind is armed with a 2 pounder. 11th June 1945 Tarakan, Borneo – Source: Australian War Memorial
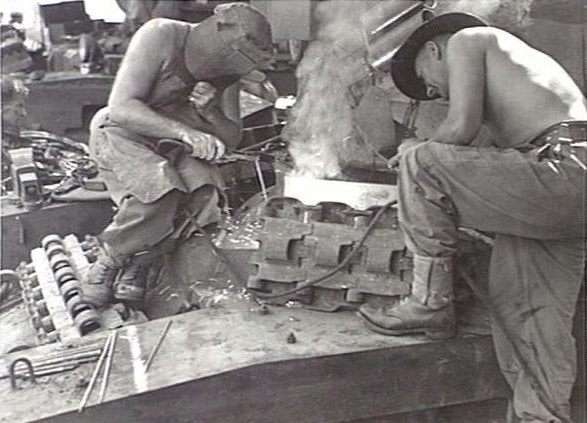
Troops welding spare track links onto Matilda II tanks of 1 troop, A squadron, 1 Armoured Regiment. 21 May 1945, Morotai – Source: Australian War Memorial
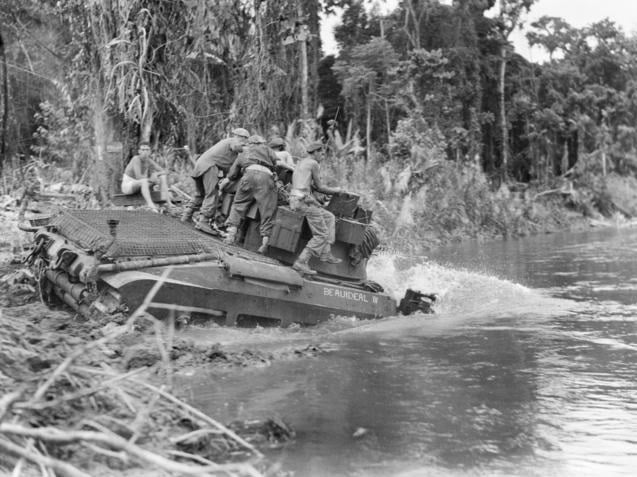
Matilda II ‘Beau ideal IV’ of B squadron, 2/4 Armoured Regiment fording the Puriata river. The rear engine deck has been fitted with a mesh cover to protect the engine louvers from grenades. Bougainville, 30 March 1945 – Source: Australian War Memorial
Mud scraper
On Bougainville island, in Borneo, Australian Matilda IIs faced a new challenge in the form of the coral mud which was frequent in the area of operations. The coral mud was thick and, due to its concrete-like composition of sand and coral shards, it tended to solidly pack any recess it could fill, most commonly on the inner surface of the tank’s drive sprockets. As the mud built up it increased the effective diameter of the sprocket and put additional tension on the track, which would, over time, either cause the track to break or warp the front idler axles.
To fix this problem, personnel of B squadron, 2/4 Armoured Regiment, developed a simple mud scraper for field installation. The scraper consisted of a piece of metal shaped like a bent capital Y and affixed forward of the drive sprocket behind the suspension skirting. Under operation the wedge part of the scraper sat between the rims of the sprocket close to the inner face and would deflect off mud as it built up around the inner circumference of the sprocket. The scraper appears to have been a simple and ingenious solution to the mud problem, although it is unclear how widespread the installation was across vehicles in the unit.
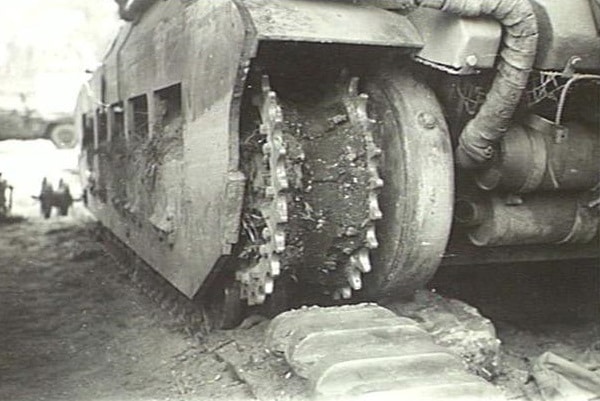
Coral mud built up in the sprocket of a Matilda II tank of B squadron, 2/4 Armoured Regiment. Bougainville, 21 February 1945 – Source: Australian War Memorial

The mud scraper undergoing tests (right) fitted to a Matilda II tank. As you can see, the sprocket on the left-hand side remains clogged with densely packed mud while the right-side sprocket has been cleared of mud by the scraper. Bougainville, 21 February 1945 – Source: Australian War Memorial
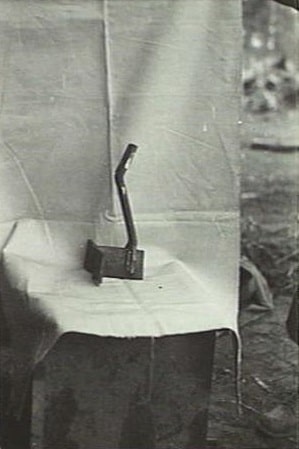
The mud scraper detached from the tank. The 3 flat surfaces on the left are the mounting brackets which are welded to the tank, the angled and vertical piece sit between the sprocket and remove the mud, Bouganville, 21 February 1945 – Source: Australian War Memorial
Improved cupola
Combat conditions in New Guinea revealed a need for improved vision on the Matilda II tank. The standard Matilda II turret cupola was typical of early war British designs, featuring only one rotatable periscope for vision when the tank was ‘buttoned up’ with the hatch closed. In jungle combat, tanks made for prominent targets and attracted heavy fire from concealed machineguns, which, while unable to damage the tank, frequently necessitated that the crew to operate the vehicle buttoned up.
In early 1944, a prototype for an ‘All around vision’ cupola was produced and subjected to preliminary (non-combat) tests in New Guinea. Weighing approximately 900 lbs (408 kg), the new cupola was cast by the Charles Ruwolts firm of Melbourne using ABP4 armored steel. The cupola was taller than the late model Matilda II cupola general found on Australian tanks and the sides were substantially thicker to offer increased protection. The cupola featured 8 vision slots around the circumference, backed by armored glass and was mounted on a ball bearing race allowing for it to be freely rotated by the tank commander. The two-part hatch from the standard cupola was retained and fitted to the new style cupola. A locking pin was also provided to prevent unwanted rotation of the cupola.
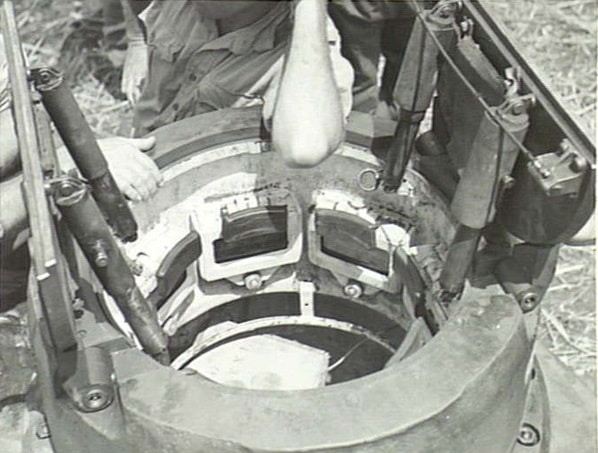
The prototype cupola mounted on the test turret prior to firing trials. The standard Matilda II hatch, Commander’s vision blocks and Commander’s traverse hand rail can all be seen. Gusika, New Guinea, 15th March 1944-Source: Australian War Memorial
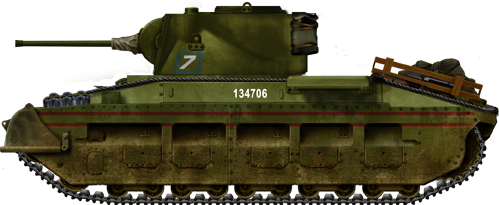
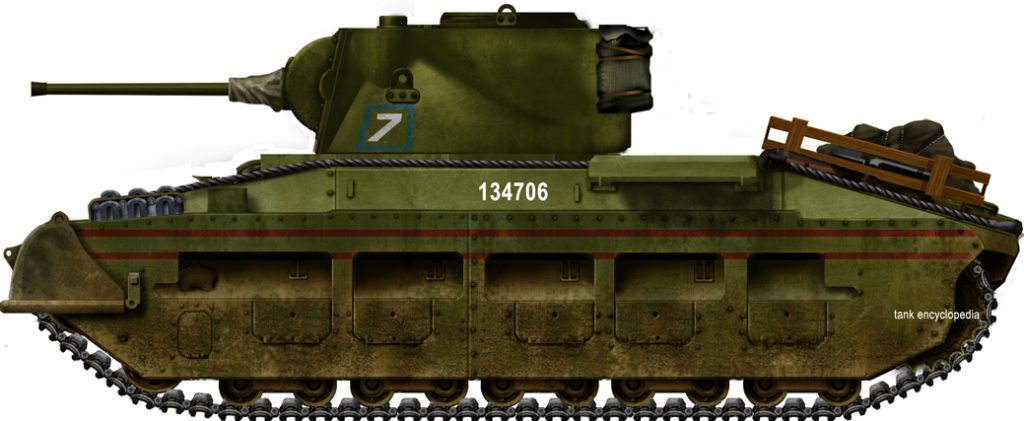
Illustration of the Australian Matilda II by David Bocquelet
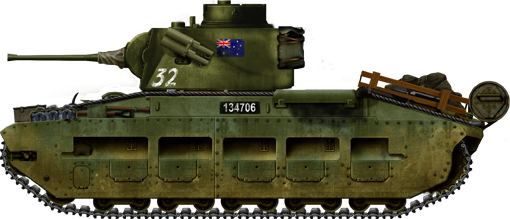
Matilda Mk.V of the Australian 2/9th Armoured Regiment, at the battle of Tarakan, Borneo, May 1945.
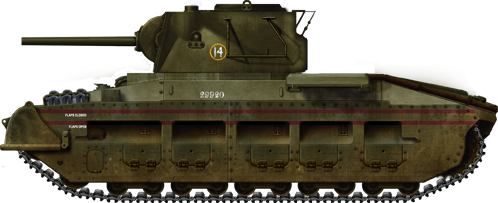
Matilda II CS, Australian 1st Tank Battalion, battle of Huon (New Guinea), January 1944.
The tests revealed that the cupola was satisfactory in providing convenient all round vision for the commander and that the bearing race was satisfactory, with rotation of the cupola on even ground being easy and controllable. However, significant defects were also encountered in the cross-country trials. On rough ground, it was found that it was impossible to control the cupola rotation in any sort of usable manner. As the reporting officer put it ‘the commander receives a severe buffeting, and requires all his strength to “hold on” to avoid personal injury.’ Furthermore, it was found that the locking pin was mounted too high in the cupola to engage with the standard locking mechanism, requiring field modification for the tests. The locking pin also failed several times on the cross-country course due to the springs being insufficient to withstand the jolting of off-road movement.
Subsequently, the cupola was fitted to the turret of a damaged tank from C squadron (named Calamity Jane) and test firing of various small arms and AT weapons was conducted at a range of 70 yards (64m). The cupola proved to be resistant to 9 mm (0.35 in) and rifle caliber small arms as well as high explosive shells from a 3’’ (76.2 mm) howitzer. While largely proof against .55 in (14 mm) Boys anti-tank rifles, it was shown that they could penetrate the viewing slots and glass. The cupola failed under fire from a 2 pounder gun, resulting in several clean penetrations of the turret which the cupola was supposed to be proof against.
Subsequently, a metallurgical analysis was requested to explain the armor failure and it was proposed that another prototype be cast by the Sydney firm Bradford & Kendall. However, it is not known if this was proceeded with. The cupola was ultimately not adopted.
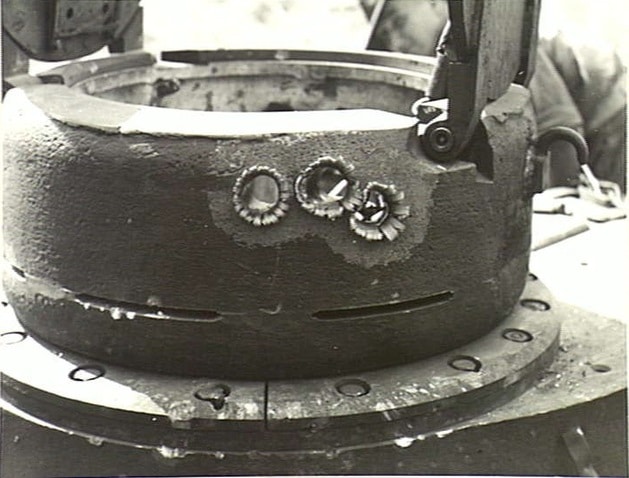
The prototype cupola mounted on the test turret post firing trials. Three Armor Piercing 2 pounder shells have cleanly penetrated the turret side and embedded 1/4-1/2″ on the interior . Gusika, New Guinea, 15th March 1944-Source: Australian War Memorial
Matilda II Tank T29923 ‘ACE’ of A squadron 1st tank battalion test firing 3’’ howitzer shells against the prototype cupola, which can be seen to the left of the image. Note the differences between the prototype cupola and the standard low profile cupola fitted on ACE. Gusika, New Guinea, 15th March 1944-Source: Australian War Memorial
Smoke generator
In 1944, a smoke generator unit was tested for use on the Matilda II tank in order to allow tanks to lay a smokescreen for advancing infantry. The smoke generator was a pre-existing design intended to be fitted to a variety of tank types, however modification was required to fit the system to the Matilda II, such that it could not be installed on other tanks. The unit consisted of two fuel atomisers fitted into the fuel tanks connected to a compressed air system located in the driver’s compartment with the smoke being expelled through the exhaust system. Testing revealed that, under optimal conditions, the generator could produce a continuous smoke screen approximately 15 feet (4.57m) high and 160 yards (146.3m) long with a maximum generation time of 2 minutes and 18 seconds. The generator kit was ultimately not adopted due to smoke laying requiring the tank to advance at speed (5th gear was considered optimal) which was not possible in jungle conditions.
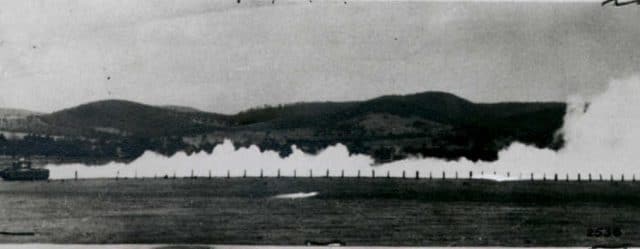
Matilda II tank laying a smoke screen during testing of the Smoke Generation unit. Australia 1944 -Source: National Australian Archives MT801/1 – TI1069
Operations
New Guinea
Huon peninsula
Australian Matilda IIs first saw action in 1943 when a squadron (C squadron) of tanks from the 1st Tank Battalion made landfall on the 20th of October at Langemak bay on the Huon peninsula. The landing of the tanks was kept a tight operational secret. Extra security was deployed to prevent Japanese reconnaissance observing the build up of man and equipment. This kept the presence of the tanks a tactical surprise. The tank squadron was a central feature in the Australian advance towards Sattleberg in November of 1943.
Nine tanks were moved to Jivevaneng and attached to support the advance of the 26th Infantry Battalion. To maintain surprise, an artillery barrage was used to cover the noise of the tank advance. The initial attack began on the 17th of November. However, the sheer hills (dubbed ‘razorback ridges’) and thick jungle hindered the advance, requiring substantial engineering support to move the tanks up. Subsequently, it was decided that the advance would proceed under infiltration tactics, with small company sized forces of men advancing on narrow fronts ahead of 1-2 supporting Matilda II tanks with an attached engineering contingent.
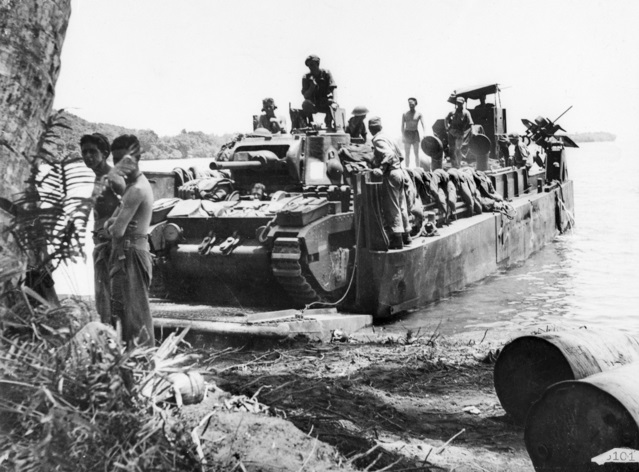
Australian Matilda II tanks debarking from a Landing Craft Medium (LCM), Finschhafen area, New guinea, September 1943 – Source: Australian War Memorial
Despite close cooperation between tanks, engineers and infantry, the advance was still slow, with only 450 yards (411m) gained on the first day. Despite the slow progress, the presence of the Matilda II tanks was a distinct advantage; utilizing machine-gun fire and High Explosive shells, the tanks could strip away jungle foliage to spoil Japanese ambushes and keep infantry casualties to a minimum. The Japanese, for their part, quickly learned that their 37 mm (1.46 in) offered no substantial threat to the tanks and began to formulate ad hoc anti-tank defenses or retreat to defensive positions on the higher ridges that they assumed the tanks could not reach.
An incident from the 2nd of December 1943 illustrates the sheer durability of the Matilda II tank. Having advanced in support of infantry pinned down by Japanese fire, a Matilda II was engaged at close range (50 yards/45 m) by a Japanese 37 mm AT gun and suffered a broken track. A group of twenty Japanese soldiers advanced on the tank and began to hurl grenades and anti-tank mines from a ditch close to the vehicle. The tank could not move nor depress its weapons sufficiently to return fire on the Japanese infantry but continued to fire with the main gun and coaxial MG to deter enemy advances. Shortly afterwards, a Japanese 75 mm (2.95 in) howitzer opened fire on the stricken tank, damaging the frontal track idlers and suspension. When all ammunition was expended the crew locked the main access hatches and crawled back to the nearby allied infantry via the escape hatch under the tank. Having sustained a total of fifty direct hits from enemy fire, the tank was still able to drive away after field repairs on the following day and was back in action by December 4th.
The advance beyond Sattleburg continued at an increased pace as Japanese resistance wilted under the weight of the advancing Matilda II tanks. The Japanese holdout at Fortification Point was subdued after a difficult creek crossing by A squadron of 1 Armoured Regiment with the advance to the final objective of Sio beginning on the 21st of December 1943. By the 2nd of January 1944, the Australian advance across the Huon peninsula had reached the halfway point, just 46 days after the first tanks had entered action. The Huon campaign effectively concluded for the Australian armor by the 9th of January 1944, with 1 Armoured Regiment returning to the mainland in May-June of 1944.
In the wake of the Huon campaign, Lieutenant-General Sir Leslie Morshead tendered a report emphasizing the value of the Matilda II tank in jungle operations. The slow rate of advance under jungle conditions was considered ideal for the low gearing of the Matilda II tank and the heavy armor and effective armament allowed the tanks to easily accomplish the role the infantry tank was designed for, supporting infantry and engaging enemy strong points.
Combat experience had shown that the 3’’ (76.2 mm) howitzer was an ideal weapon for jungle fighting, its moderate caliber allowing for a large quantity of ammunition to be carried while still being sufficient to destroy hostile strongpoints. The Matilda II was also praised for its compact size, being transportable on the Landing Craft Medium (LCM), as opposed to the Churchill, which would have required the use of the much larger, and more scarce, Landing Craft Tank (LCT).
Wewak and Bougainville
in preparation for further operations, the 2/4 Armoured Regiment sailed to Madang from Brisbane on the 25th of August 1944. Anticipating operations in widely separated areas, the regiment had broken down into squadron groups, each with their own signals personnel, field workshop and field park detachment. By November of 1944, C squadron was moved up from Madang to support the 6th Division in clearing out remaining Japanese forces at Wewak.
Having had no combat experience in New Guinea and no previous cooperation with tanks, the first order of business was to conduct field training for cooperative action between C squadron and infantry of the 6th Division. Much like the Huon campaign, conditions in Wewak were not ideal for tank operations and, given the scattered nature of the Japanese forces that had retreated in the wake of the Australian advance at Huon and the Americans at Aitape, the advance of the Matilda IIs was constantly delayed.
Hence, despite being deployed in November of 1944, C squadron did not see combat until the 6th of January 1945 at Matapau. For two weeks, starting on the 16th of February, C squadron supported the 2/1 Battalion across multiple creek crossings and difficult terrain in clearing the ridges south of Dogreto bay. After this, the tank advance was found to be untenable due to lack of bridging supplies and the squadron was withdrawn to Dogreto bay to wait for landing craft before later re-joining the infantry at Dagua airfield.
Given their lack of experience operating alongside tanks, the infantry units of 6th Division apparently did not see the value of the available tank support. C squadron found itself with little to do until the final assault on Wewak on the 3rd of May, during which the tanks took a leading role in subduing enemy strongpoints and became highly popular amongst the infantry. Unfortunately, this boost in confidence came too late, as by mid-May 1945 C Squadron’s role in the war was over and it subsequently returned to the mainland for discharge.
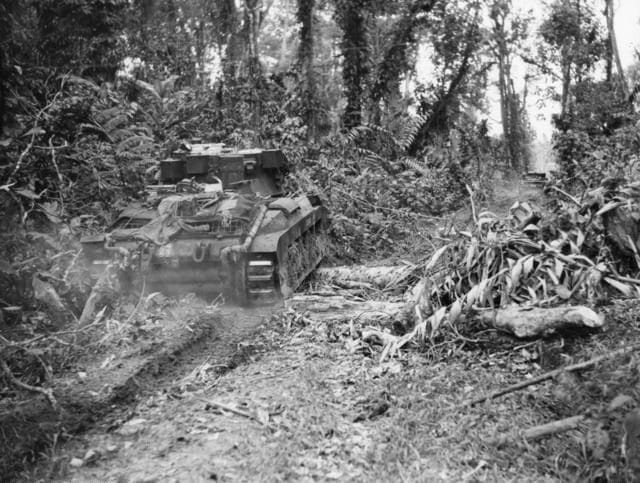
A Matilda II of B squadron, 2/4 Armoured Regiment traversing fallen logs while advancing along a jungle track. 18 April 1945 Bougainville – Source: Australian War Memorial
Meanwhile, B squadron, 2/4 Armoured Regiment, had sailed from Madang to Torokina, Bougainville, on the 16th of December 1944. In parallel to C squadron’s experience, B squadron had to spend several months undertaking in-theater training with the infantry of 3rd Australian Division. After moving their base of operations to Toko, B squadron finally saw action on the 30th of March 1945, when two troops were requested forward to counter attack in support of two companies from the 25th Division, which had been encircled and were under heavy Japanese fire.
With much difficulty, including multiple tanks bogging down in the muddy conditions and the loss of one tank in a creek crossing, the tanks arrived at the allied position north of Slater’s Knoll on the 31st of March. After assessing the disposition of allied forces, they began a counter attack which repulsed the Japanese force before operations were ceased at nightfall. Subsequently, between 5-6 of April, the Japanese resumed attacks against Slater’s Knoll but were again repulsed by the Matilda II tanks.
After the attacking Japanese entrenched themselves outside of the Australian position, one troop of tanks supported by infantry advanced to clear them out. The advance of the tanks upon the infantry positions was not something the Japanese had prepared for and the subsequent retreat collapsed into a rout in the space of roughly ten minutes, resulting in the almost complete destruction of the Japanese force.
From the 13th of April, the Australian forces advanced southeast towards Buin with the main Japanese force expected to be encountered between the Hongorai and Hari rivers. As the Australians advanced, it became clear that the Japanese lacked Anti-Tank (AT) guns sufficient to damage the Australian Matilda IIs, and so instead resorted to improvised measures such as firing artillery over open sights, utilizing aircraft bombs as high yield mines and burying anti-tank mines in wooden boxes to fool magnetic detectors.
These new anti-tank methods also included the use of a 15 cm (5.9 inch) artillery field gun firing high explosive fragmentation (HE) shells at the Australian tanks. These howitzers could substantially damage a Matilda II tank and the other weapons were effective as well. This forced a reversal in the previously established method of tanks leading the advance. Instead, infantry and mine detection teams began to lead, with tanks following to attack once enemy positions were located and mines cleared. B squadron continued operations in the Bougainville area until the news of Japanese surrender on the 11th of August 1945.
Borneo
Tarakan and Balikpapan
In February of 1945, Australian forces had been preparing for a joint assault to retake the Philippines alongside American forces. However, in mid-February, it was decided that Australian forces could instead be better used to retake strategically important oil fields and rescue allied prisoners of war held in horrific conditions on the Island of Borneo. The various battles of Borneo campaign were given the designation of ‘Oboe’. Australian Matilda Tanks would see combat at Balikpapan on the mainland of Borneo (Oboe two) and on the nearby Islands of Labuan (Oboe Six) and Tarakan (Oboe One) .
Tarakan
Australian tank crews faced their fiercest challenge of the Second World War on the island of Tarakan, where the Matilda II was forced to contend with not only the harsh conditions of the Pacific but also against an established network of bunkers and defences. The attack began on the 1st of May 1945 and would last for 6 weeks with C squadron, 2/9 Armoured Regiment and elements of the 2/1 Australian Armoured Brigade reconnaissance (recce) Squadron.
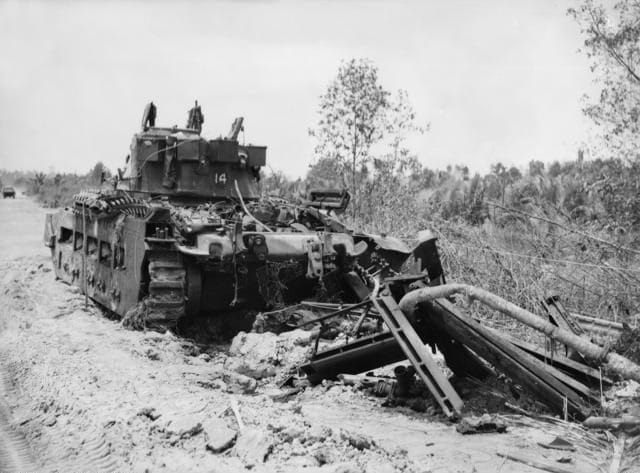
This Matilda II tank of 14 troop, C squadron, 2/9 Armoured Regiment was hurled 18 feet (5.5 m) into the air when it hit a Japanese improvised AT mine. As a testament to the toughness of the Matilda II the crew only suffered minor injuries. 8th May 1945, Tarakan, Borneo – Source: Australian War Memorial
Much like on Bougainville, Japanese defences to the tank problem proved innovative, utilising buried explosive caches as improvised mines. In some cases, even if the tank did survive, they left 30 foot (9m) craters in the valuable swamp roads. In another instance, the Japanese filled a canal surrounding the airfield with oil from the nearby refinery and set it ablaze to deter the Australian advance, and 75 mm (2.95 in) howitzer shells were slid down wires from high ground to try and disable Australian Matilda IIs during fighting in the north of Tarakan town.
Despite dogged Japanese resistance, the Rippon airfield had been secured by the Australians by May 5th 1945. Subsequent action along Snags track and towards Point 105 proved difficult terrain for the tank advance, with the assault on the Japanese position at ‘The Margy’ at point 105 requiring a combined infantry-tank attack as well as point blank fire from field artillery and even a quick firing QF 3.7-inch (94 mm) anti-aircraft (AA) Gun! By May 8th 1945, the oil fields and airfield had been fully secured and repair and rehabilitation works were underway.
Balikpapan
Much like the corresponding operations in Tarakan, the invasion of Balikpapan was intended to capture vital assets in the form of the local airfield and oil refinery. Action at Balikpapan would commence on the 1st of July 1945, led by the Australian 7th Division and a supporting force of the Australian 1 Armoured Regiment and attached squadrons of specialist equipment from 2/1 Australian Armoured Brigade reconnaissance (recce) Squadron.
Again, the Australian infantry commanders failed to apply the hard learned lessons that had come from the New Guinea campaign. Cooperation between the infantry and armor was sporadic during the initial offensive, as the 7th Division had no previous experience fighting in jungles with armored support. However, this was somewhat offset by the 1 Armoured Division’s previous jungle experience at New Guinea, as well as preparatory training in cooperation with the Matilda Frog flame tanks that were to be deployed by 2/1 Recce Squadron.
The tactical formula that had been developed involved a formation of one troop of 3 gun tanks and one troop of 3 flame tanks for a total of 6 tanks. The formation would advance in line ahead in the order of two gun tanks, followed by two flame tanks, with a gun tank behind and finally a flame tank bringing up the rear. When a target was engaged, the lead gun tanks would break off to provide crossfire from the flanks while the two flame tanks closed the range. The flame tank and gun tank in the rear provided further covering fire and security in the event of an enemy ambush. Thus, the formation could mutually support its members with both gunfire and flame attack from any direction with any of the required tanks on hand to exploit any success or cover for withdrawal as needed. Having realized the previous need for bridging on New Guinea, the 2/1 recce squadron were also equipped with a Covenanter bridge laying vehicle.
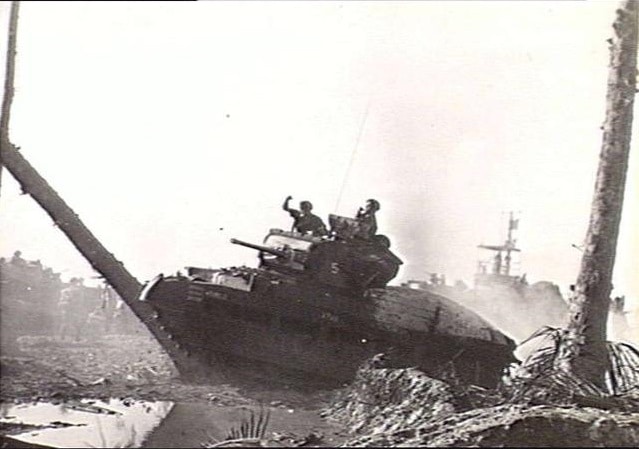
A Matilda II tank of 5 troop, 1 Armoured Regiment, pushing over a coconut palm during operation Oboe 2. Balikpapan, Borneo. 1st July 1945 – Source: Australian War Memorial
The Balikpapan landings took place near the heavily defended region of Balikpapan town, on the rationale that the initial bombardment would eliminate large amounts of hostile resistance while allowing for the fastest progress towards the main objectives. Soon after 9 am, the first tanks had made it ashore on Balikpapan in the 6th wave of landing craft, consisting of one troop from A squadron and two troops from B squadron, although there was some difficulty with tanks bogging down in the earlier stages of the beach exits. Balikpapan would prove to be the largest single deployment of Australian armor in the entire Second World War. By the end of the day, a total of 33 Armoured Fighting Vehicels (including 2 D8 tractor dozers) had landed on Balikpapan, including the specialist troops of Frog flame tanks, Dozer tanks and the Covenanter Bridgelayer.
Despite the initiative shown in equipping tanks with dozer kits to allow for immediate engineering and recovery work without the need for the D8 tractor dozers, the Matilda Dozer tanks unfortunately proved unsatisfactory during the first hours of the attack on Balikpapan and permission was given to detach the dozer blades for operation as regular gun tanks. The cooperative work between the gun tanks and Frogs proved highly effective, with success by B squadron and a supporting Frog (albeit delayed by terrain) in breaking through the built-up area of the Vassey Highway and in clearing Signal Hill in a methodical house to house sweep.
Subsequent actions along Signal hill, Tank plateau, and through Balikpapan port and town showed the effectiveness of the tank and flame combination at breaking enemy strongpoints and clearing the numerous interlinked tunnels.
On the 5th of July, two amphibious operations were conducted at Penadjam and Manggar Airfield with the support of tanks from A and B squadrons. The Penadjam operation was something of an embarrassment for B squadron, as the landing site had not been previously surveyed. This resulted in the first two tanks to hit the beach sinking up to their turret rings in the soft mud. The subsequent tanks, now forewarned, selected a better location some distance away and continued operations. The drowned tanks were later winched out and recovered.
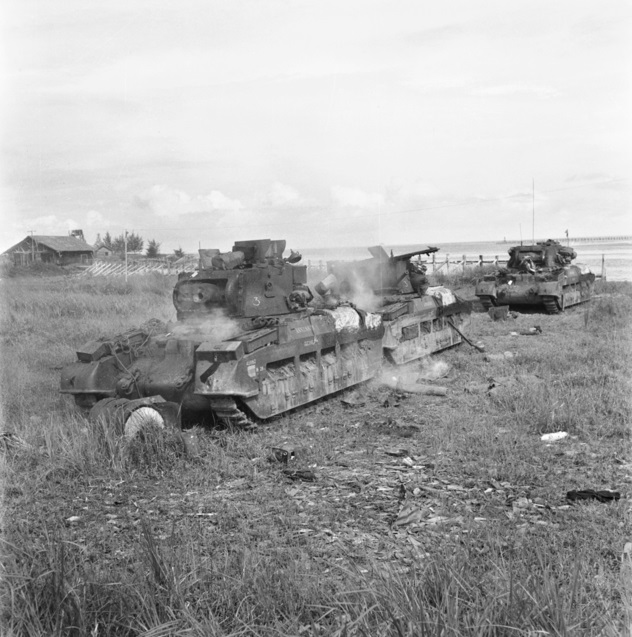
The three knocked out Matilda II tanks of A Squadron 1 Armoured Regiment, testament to the danger of the Japanese 120mm guns. Manggar, Balikpapan, Borneo, 5 July 1945 – Source: Australian War Memorial

A Japanese Type 10 120mm dual purpose gun, captured by Australian troops at the position known as ‘the Metal’. Similar guns were positioned around the Manggar Airfield. Balikpapan, Borneo, 9 July 1945 – Source: Australian War Memorial
A squadron’s attack on Manggar airfield would prove to be one of the few instances where Australian Matilda II tanks faced any sort of viable threat from Japanese anti-tank defenses. Two troops were initially landed about 10 miles (16 km) east of the airfield, supported by the Covenanter Bridgelayer. However, upon advance, it was found that the only bridge in the region had been destroyed and the span was too great for the bridge layer to cross. Subsequently, two troops still aboard landing craft were to be put into action, with one to see immediate deployment and the other staying afloat in reserve. The first troop deployed just beyond the river mouth under cover of a smoke screen and what was assumed to be a covered position.
The tanks immediately met with heavy Japanese mortar fire before being engaged at a range of 1200 yards (1.1 km) by Japanese 120 mm (4.72 in) dual purpose guns sited at the airfield. These heavy guns were more than capable of damaging the Matilda IIs and all three tanks of the squadron suffered hits, with two being destroyed and the other severely damaged. With the bridge destroyed and the presence of the 120 mm guns, the wounded crews were evacuated by sea and the remaining tanks of A squadron withdrawn from action at Manggar, marking one of the few occasions where the Japanese successfully repelled an attack by Australian Matilda IIs.

Captain D.B Hill and Corporal I.R Corr inspecting Japanese artillery damage on Matilda II tank ‘Beaufighter’ of B squadron, 2/4 Armoured Regiment. 16 May 1945 – Source: Australian War Memorial
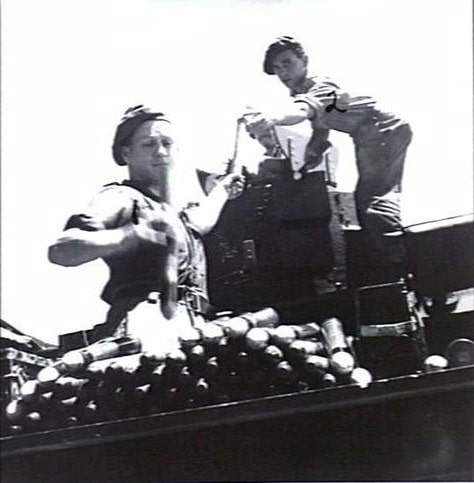
Troops loading high explosive 2 pounder shells into a Matilda II of 2 troop, B squadron, 1 Armoured Regiment – Source: Australian War Memorial
Obsolescence, disposal and surviving vehicles
Matilda II tanks remain common in AFV collections globally. As Australia was the last major operator of Matilda II tanks, a large majority of surviving Matilda II tanks are either located in Australia or sourced from Australia. At the end of the war in 1945, the Matilda II was declared obsolete by the Australian army and officially replaced in Australian armored units post-war by the Churchill.
Matilda II tanks deployed to the Pacific were not required to be returned to Australia and many were either abandoned in situ or dumped at sea. By 1946, it was determined that there were insufficient parts to maintain the remaining Matilda IIs and that the remainder of the fleet would only be operable for the remaining 6 months, leading to the tanks being retired from service. A small number of Matilda IIs were retained by the School of Armour at Puckapunyal post-war for training use. Tanks remaining in Australia were disposed of by the Commonwealth disposals commission.
Like the stockpiles of M3 medium tanks and the local produced AC I tanks, Matilda II tanks were sold off to civilians for conversion into agricultural tractors. Many of these tractor conversions were used across Australia and subsequently abandoned when they broke down beyond easy repair or were replaced by cheaper civilian vehicles. As such, many Matilda II hulls and components can be found in varying states on rural Australian farms and scrapyards. In recent years, these rural stocks have provided a boom in both whole hulls and components for private collectors.
One such tank was recovered in Moss Vale, New South Wales, in 1997. It was determined by the NSW Lancers Memorial Museum that this tank was number T29923, a 3’’ gun tank named ‘ACE’ of A squadron, 1st Armoured Regiment (now the New South Wales Lancers). ACE was the first Matilda II tank to land on Balikpapan during operation OBOE 2 in 1945, and can be distinguished in historical photos by its distinct Ace of spades playing card mascot. After two years of volunteer work, ACE was reunited with the original 3’’ gun turret and restored to full running condition in 2015, and is now held in the collection of the New South Wales Lancers memorial museum
The Royal Australian Armoured Corps museum at Puckapunyal, Victoria, has the largest single collection of Australian Matilda II tanks. The Puckapunyal museum has a total of six tanks in the collection, including two 2 pounder tanks and one 3-inch gun tank, as well as 3 examples of special equipment tanks
The Australian Armour and Artillery Museum at Cairns also has two Australian Matilda II tanks in their collection. The AAAM tanks are a 2 pounder gun tank fitted with the track idler guards and turret collar and a recently arrived number 3 type Dozer tank. Neither tank is functional.
Matilda II tank T29923 ‘ACE’ of A squadron 1st tank battalion replenishing 3’’ howitzer ammunition. Kiliga, New Guinea. 16 March 1944 – Source: Australian War Memorial

Matilda II tank T29923 ‘ACE’ of A squadron 1st tank battalion, post restoration on display at the NSW Lancers Memorial Museum, Parramatta New South Wales 2017 – Source: NSW Lancer Memorial Museum
Matilda II specifications |
|
| Dimensions | 18 ft 9.4 in x 8 ft 3 in x 8 ft 7 in (5.72 x 2.51 x 2.61 m) |
| Total weight, loaded | 25.5 tons (25.6 tonnes) |
| Crew | 4 (driver, gunner, loader, commander) |
| Propulsion | 2x Leyland E148 & E149 straight 6-cylinder water cooled diesel 95 hp engine |
| Max. Road Speed | 15 mph (24.1 km/h) |
| Operational Road Range | 50 miles (807 km) |
| Armament | 2-Pdr QF (40 mm/1.575 in), 94 rounds Besa 7.92 mm machine-gun, 2925 rounds |
| Armor | 15 mm to 78 mm (0.59-3.14 in) |
| Total production | 2,987 |
| Data source | Infantry Tank Mark II Specifications, by J.S. DODD The Vulcan Foundry Ltd, Locomotive Works, August 1940 |
Sources
Infantry Tank Mark IIA* Specifications, The Vulcan Foundary Ltd by designer Sir John Dodd August 1940
Infantry Tank Mark II manual, War Department
Osprey Publishing, New Vanguard #8, Matilda Infantry Tank 1938-45
Hopkins, Ronald Nicholas Lamond and Australian War Memorial Australian armour : a history of the Royal Australian Armoured Corps, 1927-1972.
Fletcher, David and Sarson, Peter Matilda infantry tank 1939-1945.
Bingham, James Australian Sentinel and Matildas.
The National Archives of Australia
Infantry Tank Mark II Specifications, by J.S. DODD The Vulcan Foundry Ltd, Locomotive Works, August 1940
43 replies on “Matilda II in Australian Service”
This has to be one of the best and most informative article on the Matilda in Australian service in the PTO during World War II.
Expect more articles of the likes of this one.
– TE Moderator
I have been hunting around for some time now on the organisation on the Matilda equipped armoured units. I have had very little luck and was hoping if you had any further info for me.
This is more of an estimation.
Units deployed were at Squadron and Troop level.
Was it 17 tanks in total for a SQN?
2 tanks for the SQN HQ – 1 HQ @ 2 = 2 Was there even a SQN HQ element or was 1, 6 and 11 TP the SQN HQ element.
3 tanks per TP x 5 TP per SQN = 15
15 tanks per SQN + HQ = 17
Since no unit deployed as a Regiment did the regimental HQ even have tanks?
Any information or direction to some would be greatly appreciated.
Awesome article.
According to Peter Donovan’s ‘Waltzing Matildas’ a squadron consisted of 5 fighting troops plus one fighting HQ troop, all of 3 tanks, for a total of 18 per squadron. An ‘Armoured Regiment Tropical Scale’ consisted of 3 fighting squadron groups (54 tanks), however Donovan also lists the total number of tanks as 58 per regiment and does not specify if the remaining 4 are for a regimental HQ element or simply reserve vehicles
TE Moderator, Author
Very much appreciated.
Great article.
Three Matilda hulls are located in Murrayville Victoria, in various state of damage. I have some photographs if you want them.
Cheers
I am familiar with these tanks and have visited them on and off over 30 years. https://www.travel-news-photos-stories.com/2016/01/wwii-tanks-in-aussie-bush.html
Would you have any knowledge or an image of a Matilda from No. 8 Troop, B Squadron, 2/4 AR named “Bendigo Babe”?
I have a Trove article about it but would love an image.
Unfortunately I haven’t been able to find any photos I can confidently Identify as being ‘Bendigo Babe’, annoyingly most of the photos of 8 Troop in the collection of the AWM are taken from angles that obscure the markings on the vehicles.
I did find a few things that may be of interest to you however.
Firstly I did find one photo of an 8 troop tank where the markings can be vaguely seen, based off of the letters present I would tentatively identify it as being ‘Brandy’, one of the other tanks mentioned in the newspaper articles on Trove, however the markings are partially obscured so I cannot be 100% positive
https://www.awm.gov.au/collection/C195116
According to the articles on Trove the gunner of ‘Bendigo Babe’ was one ‘Dick Allen’ (dick of course being short for Richard). I was able to track down a photo of 8 troop which identifies the men present, front row left most is Trooper Richard Francis Peter Allen (service no VX66953), gunner of ‘Bendigo Babe’, although the tank behind them is not from 8 troop.
https://www.awm.gov.au/collection/C75962
I was also able to find a photo of Trooper Allen working on a Matilda tank of C squadron 2/4 AR, I believe he is the one standing on the front of the tank looking at the turret.
https://www.awm.gov.au/collection/C84854?image=1
Knowing Trooper Allen’s service number his records are available in the National Archives under said number (VX66953)
https://recordsearch.naa.gov.au/SearchNRetrieve/Interface/DetailsReports/ItemDetail.aspx?Barcode=6122318&isAv=N
Additionally the Australian War Memorial have several records relating to B squadron of 2/4 AR which may prove useful, they can be found on the website of the National Archives
https://recordsearch.naa.gov.au/SearchNRetrieve/Interface/ListingReports/ItemsListing.aspx
I hope this has helped, by all means feel free to ask any additional questions that may arise from your research
TE Moderator, Author
Hi Thomas
Thanks for your help. Sgt. Royce Whatley MM and Maurie Hunter from Bendigo were also in Bendigo Babe. Royce was the tank commander and Maurie the driver as I understand. Royce was awarded the MM for an action in Bougainville where he evacuated the other member of the tank Frank Clark to safety under heavy enemy fire.
I hope eventually to find Bendigo Babe, but if that is Brandy, then that is awesome.
I did find a photo of Castlemaine undergoing maintenance but now I dont know where I found it. It was a good photo. If you knew where to find it, I’d be very appreciative.
regards
Luke Barkmeyer
Bendigo Soldiers Memorial Institute Military Museum
Is it possible to find the history of a certain Matilda? WD T 19023 over 369 is stamped on the tank.
It is possible but it can be difficult. The most readily available resource that I know of is a compilation of known tank data that has been assembled by the team at Mouse House. I Checked and the vehicle in question is a MkIV 3″ Close Support tank, however they don’t have any know unit listings for it. Checking the unit diaries from 4 Armoured brigade group held at the AWM (1st Armoured regiment, 2/4 Armoured Regiment, 2/9 Armoured Regiment) might have record of which vehicles were issued but I cannot confirm as I haven’t checked these myself as of yet. Do you have any other details you can share about the vehicle which might be useful points of reference?
http://www.mheaust.com.au/Aust/Research/Matilda/matildaCS.htm
Author, TE Moderator
2 pounder never had HE shells. it was part of the reason why it was phased out later on.
The 2 pounder did have a HE shell, and it was issued and used in combat, albeit as far as I am aware it was not extensively issued outside of its use in the South West Pacific by the Australians and New Zealanders.
British practice predominantly issued them to towed anti tank guns under the reasoning that it could be used for infantry support and counter battery fire against enemy anti tank guns, very rarely was the 2 pounder HE shell issued to tanks in British service
However, Australia issued HE shells to Matilda tanks in the South West Pacific because the need for AP rounds was significantly less than the need for an anti infantry/soft target round (AP shells were used against bunkers, although the effectiveness was limited).
Australia also produced several locally designed/converted HE shells, such as a base fused type made by combining a Bofors 40mm HE shell with the propellant casing for a 2 pounder HE shell. I have documentation from the archives covering some of these local designs
Author, TE Comment Moderator
CMF units used Matildas from 1948 to about 1952. 12/16 Hunter River Lancers used Matildas. There is a photo of a Maitilda next to a Centurion at Singleton camp around 1952. They were replaced by Staghounds.
All the footage I have seen of 1 Arm Bn in Balikpapan shows the arm of service sign as being the “fraction type”, presumably on a green background, reading “1/52”, as opposed to simply “52” on a red background. Is it possible that 1 Arm Bn had changed to this form of sign by the time of the Borneo Campaign?
I now note that the Matilda CS tank “Ace”, 1 Arm Bn, as restored by the Lancer Barracks in Parramatta, has the arm of service sign in the “fraction form” 1/52. However, it is neither on a green nor a khaki green background, but on a black square. Is this accurate?
As far as I know 1st Arm Bn/Arm Rgt was the only tank unit to use the white on red markings, before they were superseded by the fractional markings post 1943. The red colour indicated that the vehicle was from 1 Arm Rgt as they were the senior regiment that was their insignia colour (red is still the colour of 1 Armoured Regiment in the RAAC), however under the fractional system the unit number was used, making the colour redundant. By Borneo they were using the newer fractional markings, I haven’t seen any documentation confirming the reason for the change but I suspect it had to do with the reorganisation of 4th Armoured Brigade Group.
As for the black background for the markings on Ace, I can’t say 100% if its accurate or not. I have yet to see any photographic evidence of black being used on the unit markings on the front of Matildas, however supply of paint wasn’t always reliable and I have seen multiple documents talking about alternative paint colours that can be used if the officially prescribed colour was unavailable.
Author, TE Comment Moderator
Thank you very much for your help. Since I live near Lancer Barracks I will view “Ace” shortly and if possible inquire about the markings.
I have just returned from (finally) managing to see “Ace” at the Lancer Barracks in Parramatta. Luckily one of the restorers was on hand to answer questions. I think the following points may be of interest to this website.
First, he confirmed that a black background for the 1/52 arm of service sign was usual for the 1 Arm Bn. However, I also spotted a rare Borneo era photograph of “Ace” at the Museum that seems to show that the background of the arm of service sign was green – as far as one can tell from a black and white photo. I think I will use a black background since I don’t really trust my judgment on a black and white image which was very small.
Also, this restorer knew the traditional names of tanks in 1 Arm Bn. According to him, traditional names of 1 Arm Bn tanks of the era for B Squadron included “Bardia”, “Bucephalus” and “Beer”(!) This may be of interest to other modelmakers.
I can also confirm that “Ace” has skids, not return rollers. The rusty looking patches on the tank are actually the original paintwork, which has been left uncovered for future reference. The shade of green, which is the same as in the original scaps of paintwork as far as I could judge, is much lighter than the very dark green recommended in the Osprey modeller’s guide, and more resembles an olive drab colour.
Oh, and I see from the photograph that “Ace”‘s bridging weight number has been repainted, presumably following further research, since the photograph here. The new number is in white on a solid orange background.
Correction, the number is in black on a solid yellow-orange circle.
Just FYI, Bougainville is in the North Solomon Islands, not Borneo.
You are correct, I’ve fixed the mistake. Thanks for catching that one
-TE Moderator, Author
I’ve decided to tackle building “Courageous” in 1/48 scale, but I’m stumped as to the colours it should be. Were the Matildas repainted once they were delivered, or left in their British colours?
Hopefully you’ll see this reply. 🙂
The exact colours of vehicles is a tricky subject, for example I have seen camouflage diagrams in archival documents specifying how a 3 colour camo pattern should be applied to a Matilda tank, however I haven’t seen any photographic evidence which shows it was actually done. As far as I am aware the Matilda tanks were delivered painted in Khaki Green No.3, which is readily available in many model paint ranges. Some sources claim that the locally produced Australian Khaki paint is a slightly different Shade to No.3, however I haven’t confirmed this personally, but for your own benefit I’ve attached a sample sheet of Australian colours
https://recordsearch.naa.gov.au/SearchNRetrieve/NAAMedia/ShowImage.aspx?B=3367609&T=P&S=11
TE Moderator, Author
I am building a model of ACE. I cannot approach the Museum at present due to COVID restrictions – this situation may remain for some time…. Can anyone tell me if ACE has the turret ring guard fitted and if she has PSP or similar fitted over the engine bay?
Cheers
Yes has all the Australian mods, Turret Ring guards, Field Telephone, front tree fenders etc.
I am not entirely sure what you mean by PSP, but if you mean the anti-mine mesh on the engine bay, ACE as it is currently restored does not, from memory, have the mesh, but in action it would have had it.
PSP is short for ‘Pierced Steel Planking’, also known as Marston Matting, its a perforated sheet steel strip that can be locked together to form roadways/runways for field construction. It was used as bomb protection on the engine decks of Matilda Tanks from 2/9 Armoured Regiment, however Ace was from 1st Armoured Regiment and in action was fitted with mesh screens over the engine decks. Ace currently it isn’t fitted with the mesh screens but it has all the other modifications present.
-Author, TE Moderator
Cheers
I plan to build the model as ACE looks now as much as possible. I have two others on the go as well – one will be a 2 pounder and one a Frog.
Does anyone know if the Lancers’ museum display at The Barracks is accessible again?
It is now open!
I’m apart of the Australian model ship association called Task Force 72, and I’m studying the possibility of building a model of the USS Rushmore (LSD 14). The Rushmore was a Dock Landing Ship that could deploy a large contingent in one delivery to a beach head.
The Rushmore delivered ‘C’ squadron 2/9 AR to Tarakan on 1/5/1945, 18 Matilda 2’s were embarked in just as many LCM landing craft as well as bulldozers and other equipment.
I’m wondering what the troop numbers would have been for the tanks, so I can model them and put them in the Cargo bay of the Rushmore.
WW2 Australian Tank Regiments numbered their troops incrementally across squadrons in a regiment ie A squadron would start with 1 troop, 2 troop …. etc. C squadron of 2/9 Armoured Regiment was deployed as the whole squadron, so it was Troops 11,12,13,14,15. 13 Troop was the first to land (first tank on the beach was ‘Caesar’ of 13 Troop) followed by 15 troop and the remainder following later. However I will add that a WW2 Australian tank troop consisted of 3 tanks, which would mean 15 tanks for 5 troops. I’m not certain but I suspect the remaining 3 were reserves/replacement vehicles.
Numbers are from the Regimental History of the 2/9th Armoured Regiment, ‘Waltzing Matildas’ by Peter Donovan
-Author, TE Moderator
Thanks Thomas,
I appreciate your excellent reply, you’ve given me more information than I even hoped for.
Combat loading of the USS Rushmore would have put troop 13 the furthest aft on the ship to exit down the stern ramp first. Three LCM landing craft fit in the hold side by side each with one tank. The hold could fit 18 LCM’s each with a tank, so I’m not sure where the bull dozers would have been loaded given that a Matilda was 25 Tons, while an LCM’s capacity was 30 tons. I have the Rushmore’s Tarakan action report which states 18 tanks, plus bulldozers. I imagine the three extra tanks were reserve machines as you said, I’m also thinking that the bulldozers may have been loaded on the spar deck which was above the main cargo hold. The action report states that the spar deck cargo was off loaded by the ships cranes into the USS LCT 1331 once the main hold was empty of landing craft.
The Rushmore’s story of this landing is interesting to me not just because it was loaded with Aussie’s, or the amazing innovation that this class of ship represented at the time, but before the ship unloaded, the Rushmore was hit by a torpedo as the ship prepared to unload. The torpedo must have hit the ship at too great an angle as the torpedo glanced off the ship without exploding or causing any damage. I can only imagine what would have happened if it had of exploded, the torpedo hit at frame 56 which was next to the Port side boiler and auxiliary pump rooms. The ship could have taken all of C squadrons tanks and equipment and possibly men down with it. It’s one of those what if’s in history that thankfully never happened.
I’m hoping to find a copy of that Peter Donovan book you mentioned.
Thanks for your help,
An extra bit that may be relevant based on what you mentioned above, Donovan’s book mentions that the bulldozers were landed before the tanks were, as one of the former squadron members who was on the beach in the first wave to prep for the tank landing mentions that they had to ‘convince’ one of the bulldozer drivers to move off the beach to clear the space for the incoming 13 troop. hopefully this adds some extra clarity to the situation. The USS Rushmore does get mentioned in the book but only in passing to remark on the novelty of the technology and I don’t recall the loading of the tanks being subjected to any discussion comparative to the actual events of the landing and combat on Tarakan.
Author, TE Moderator
Hi Thomas,
It’s interesting that the Bull dozers were sent in first, it made me think that they had to be in those first LCM’s unloaded. The ship could only carry 18 loaded LCM’s, so there can’t have been 18 Matilda tanks?
Some references state 18 tanks?
But I’m thinking they may have misquoted the Rushmore’s action report as I have. I went back to the report and it does say;
“18 LCM’s loaded with tanks, bull dozers and other equipment”.
So I now think there were only Fifteen tanks, the correct number for “C Squadron”. The first three LCM’s devoted to bull dozers and the other equipment (whatever that was?) as they were landed first as you said.
Now I’m wondering whether the bulldozers were the “Le Tourneau” d7 bulldozers, or the d7 armoured bulldozers? Photos on Tarakan only show the “Le Tourneau” version. What the “other equipment” was I may never know.
I’m building a pretty good picture of the cargo layout in the ships hold with the information you’ve given me, thank you.
I could build the ship empty, it would be cheaper and easier, but it will be far more interesting with a full combat load of landing craft full of Aussie manned Armour and bull dozers. Though I won’t be putting figures on the model.
I also found a copy of Peter Donovan’s book and it’s on its way, they are quite rare and pricey.
My name Is Garry Poole my dad Arthur Poole was a gunner in the Matilda Tanks he was in the 2/4 tanks and was fighting Japs in Wewak iam 70 now and my dad died 25 years ago he was 70
My Philip Lidbetter my dad was Tom Lidbetter he was with C Squadrom I believe with the Matilda Tanks. He died in 1981. I was only 1 when he passed away. I know little. His only mention of the war was clearing the jungles to make football (Rugby League) fields in New Guinea.
My Philip Lidbetter my dad was Tom Lidbetter he was with C Squadrom I believe with the Matilda Tanks. He died in 1981. I was only 1 when he passed away. I know little. His only mention of the war was clearing the jungles to make football (Rugby League) fields in New Guinea.
Were Australian matildas used in the pacific supplied with HE rounds for the 2 pounder ?
The other day I happened to notice a Matilda tank parked in the front yard of a house in Torquay (Victoria). Looks to be complete and in fairly good condition. Does anyone know anything about this?
Forgive the pedantry, but the article has several places where it describes a 3 *foot* gun ( 3′ ) instead of a 3 *inch* gun ( 3″ ). Unless the standard notation for Imperial units isn’t used in Australia?
Cheers for providing such a lovely resource!